You use Live clips when you want to use a different source for your broadcast than the output of OnTheAir Node (for example when you want to broadcast Live News from your studio or also if you want to reroute a signal that comes from another source.
What are the different options?
Basically there are 3 ways to broadcast a Live event:
- use the "internal key" feature of your video device. You can then connect the signal of your Live source to the input of the same card that is used by OnTheAir Node. During Live events, OnTheAir Node will not playout clips and thus you will broadcast the signal that is getting in the input of the card. This is only working with AJA cards set in Internal Key mode.
- control OnTheAir CG Server (license required).
- control a video router, (AJA Kumo, Blackmagic-Design VideoHub CleanSwitch or others) or production switcher (Blackmagic-Design ATEM) to modify the source of the signal that goes to air.
Pros and Cons of the different options
| Video Router/Switcher | OnTheAir CG | Internal Key | |
| Requirements | Requires a "clean switch" video router. If using a model controlled by RS232 (see below), a USB to RS232 adapter and a license for OnTheAir Switch are required. | Requires a license of OnTheAir CG | OnTheAir Node must use a video device that supports Internal Keying and audio routing (currently only AJA devices support that) |
| Use multiple live sources (if you have multiples studios | YES | YES | NO |
| Allows maintenance during Live events | YES, you can even restart the computer as it won't be used during the live event | You can install a new version of OnTheAir Node during the Live, but if OnTheAir CG Server runs on the same computer, you won't be able to restart it if needed. OnTheAir CG Server can be installed on a different computer for this | NO |
| Clean Switch | YES when going from clips playback to Live. But from Live to clips playback, a few frames may be from the "Live" clip | YES when going from clips playback to Live. But from Live to clips playback, a few frames may be from the "Live" clip | YES |
| Overlay Dynamic Graphics | NO | YES, that's what OnTheAir CG is made for | NO |
About the application called "OnTheAir Live"
SETUP 1: Using a video router
Which video router can be controlled by OnTheAir Node ?
There are two types of interface to control video routers or switchers from OnTheAir Node:
- through ethernet: only the AJA Kumo, Blackmagic Videohub and Blackmagic ATEM can be controlled through ethernet. This makes it a very easy solution as there is no need for complex cabling, nor additional hardware, just connect your computer and the video router to the same network, install the drivers of the router or switcher if needed (for example for the ATEM) and configure their IP address correctly and that's it.
- through serial protocol: if you use a different model than the ones that can be controlled through ethernet, this is more complex but it can support more video routers. It requires a USB to RS232 adapter and a OnTheAir Switch license. We have a list of supported routers available here, if yours is not in the list, contact us, send us the protocol and exact model and we'll tell you if and when we can add the support for it. Here is what you would need to control a router through RS232.
Configuring OnTheAir Node's Plugin
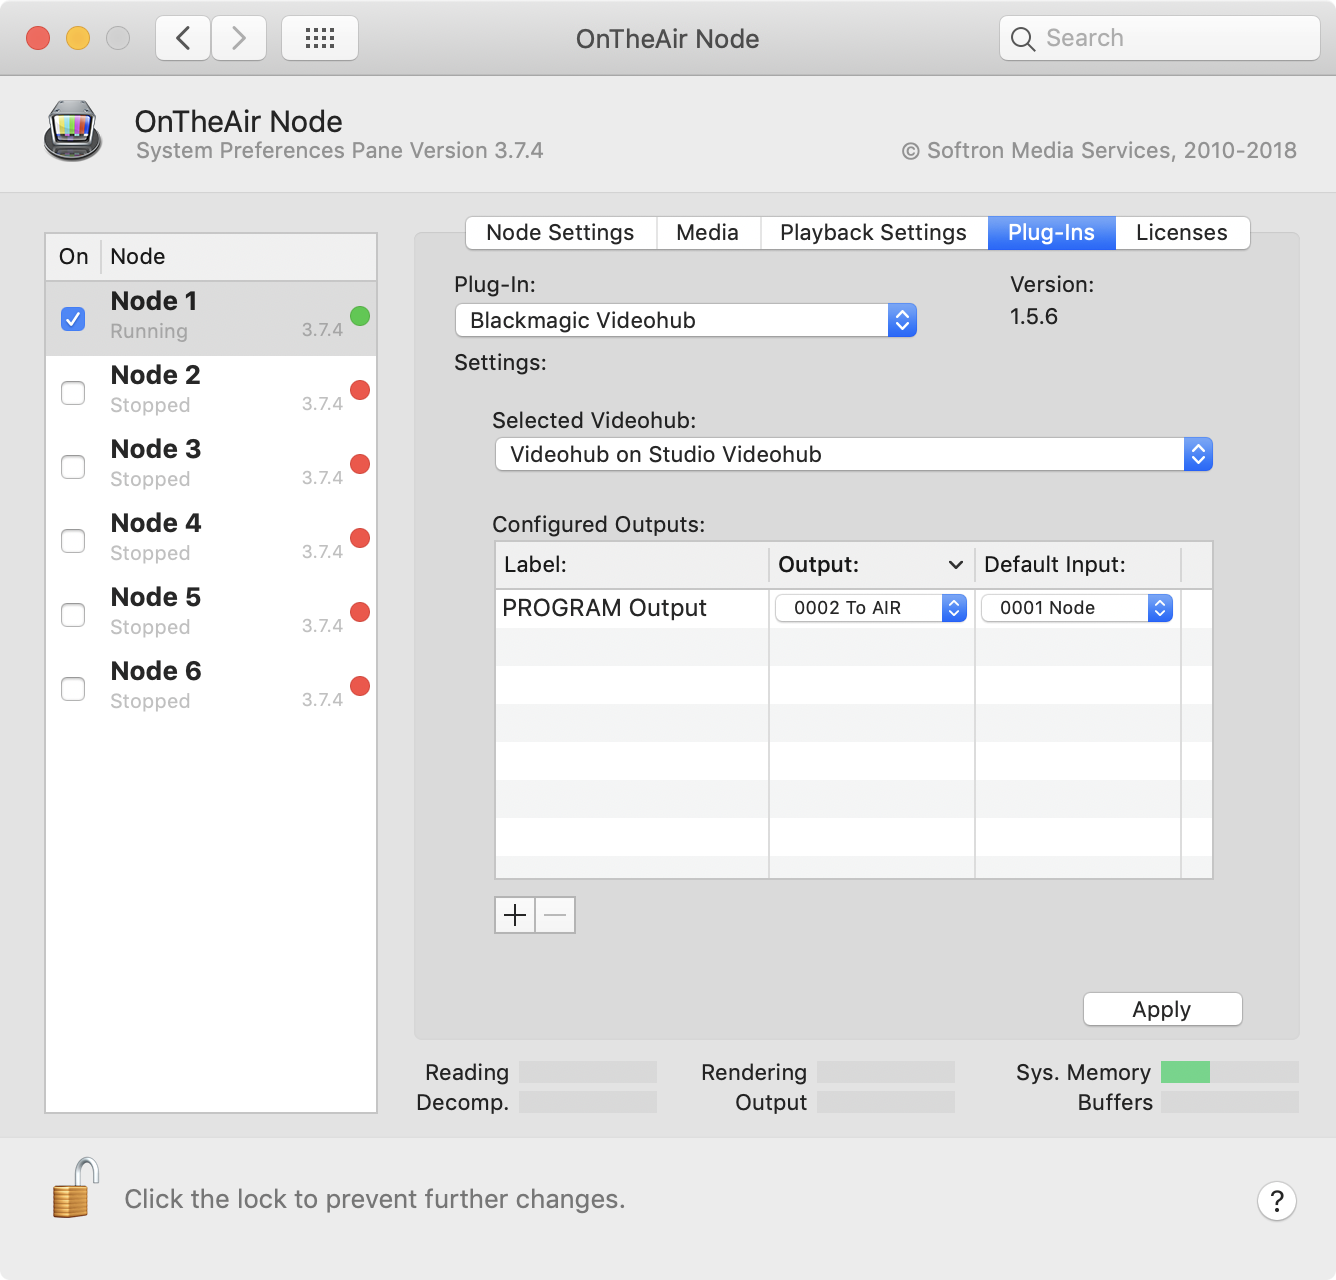
In the OnTheAir Node system preference pane:
- select the "Plug-Ins" tab,
- select the AJA Kumo, Blackmagic ATEM or Blackmagic Videohub Plug-In in the Plug-In selection popup menu. (if you use a different model, and thus control your router with RS232, see below)
- select the router you want to control in the "Selected Videohub" or "Selected AJA Kumo Device" menu. If you have only one, it will be selected by default. If you don't see your router there (it should show automatically through Bonjour), check your Network connection and your network settings on both your Mac an router.
- Add a "Configured Output" using the "+" button at the end of the list
- Set a Label (this will be the name of this output shown in OnTheAir Manager)
- Select which Output (from your router) you want to control (this must be your Main channel output)
- Select what will be the Default Input for this Output. (this should be the signal that is getting out of OnTheAir Node)
- Click on "Apply". If you fail to do so, the settings will not be remembered.
If you control your router through RS232
You will need different things beforehand:
- make sure that your router can be controlled through RS232, and that the RS232 port is not already used
- connect the USB to RS232 adapter to your Mac
- connect the RS232 cable from that USB adapter to the router (make sure the pinouts are correct, as this is the most common mistake when user can not communicate with their router from OnTheAir Switch)
- install and configure the OnTheAir Switch software (all communications to the router will go through this software). Make sure that you can connect to the router from OnTheAir Switch. OnTheAir Node will not be able to control your router if OnTheAir Switch can not.
- make sure OnTheAir Switch is running at all times (add it to the "Login items", in the "Users & Groups" System Preference Pane )
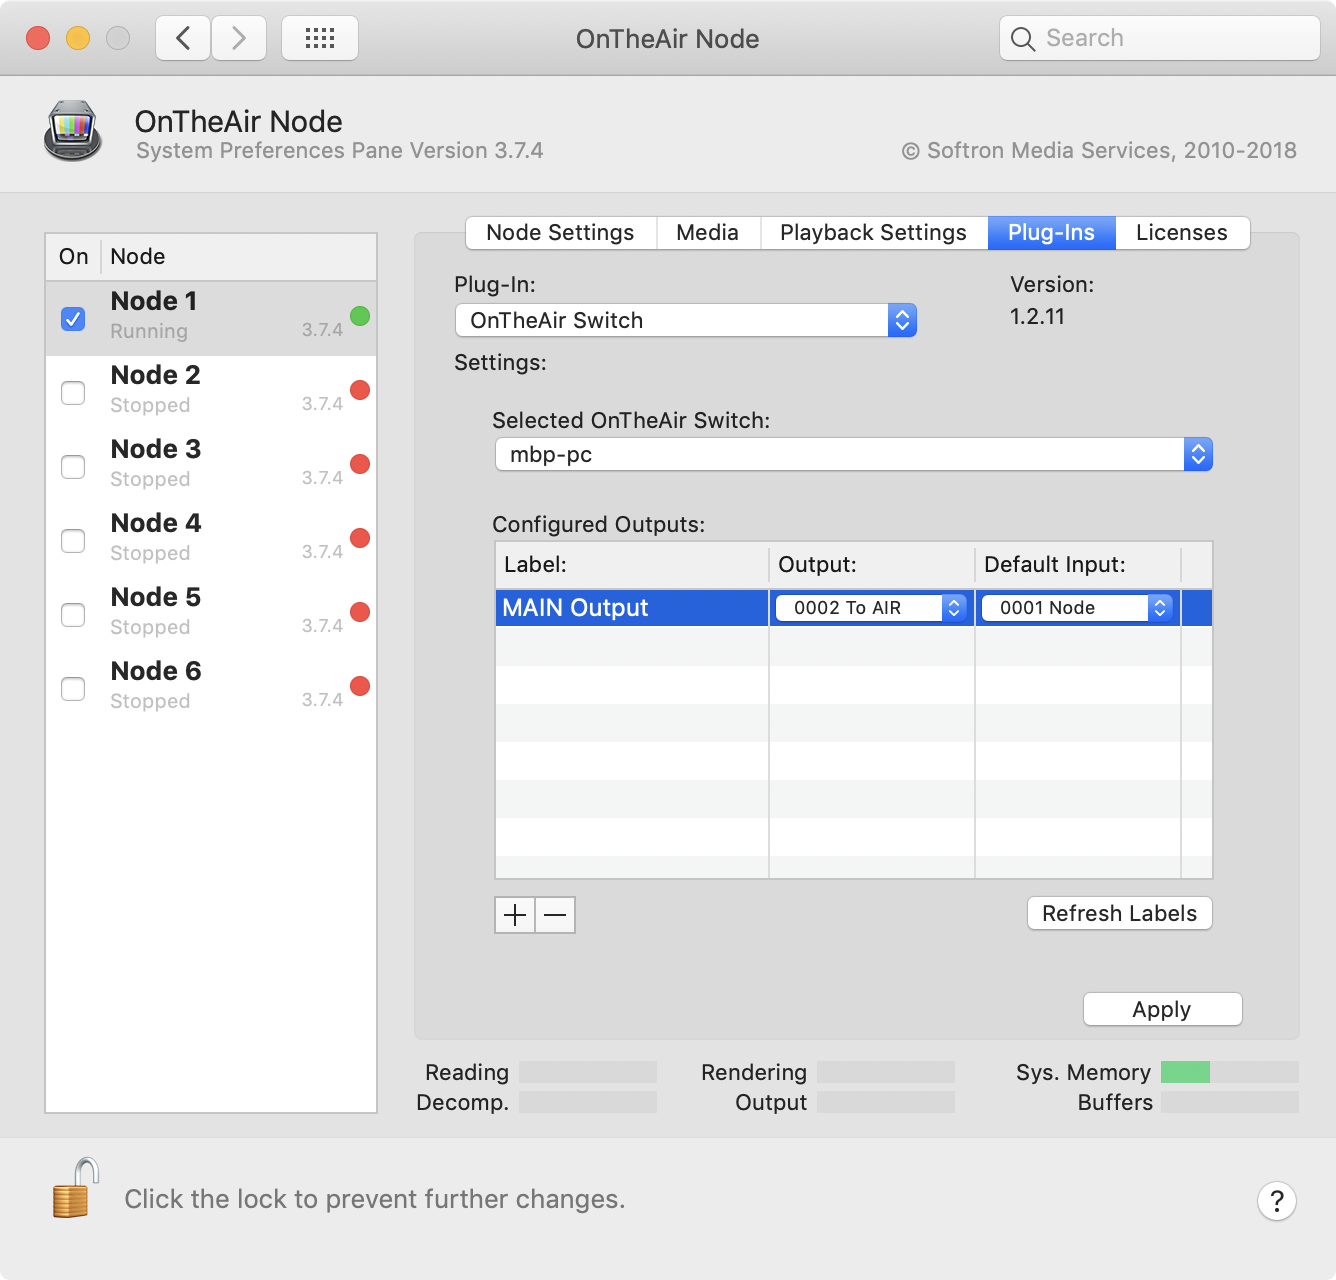
Once your have OnTheAir Switch working, select the "OnTheAir Switch" plugin in the OnTheAir Node Plug-Ins preference pane:
Attributes for Live clips using a Video router
Once you have configured the output(s) you need to control and set their "Default Input", you will be able to set the attributes of your Live clip(s) in OnTheAir Manager. (See below to know how to create a Live Clip)
To set the attributes of a Live clip in OnTheAir Manager:
- select a Live Clip in the Media Browser (you can select multiple clips at once). Note that if you change the attributes in the Media Browser, it will be applied automatically to all Live clips, but if you change the attributes in the events and playlists, the change will only be for that specific occurence and changes made in the Media Browser won't impact).
- double-click on it or use the cmd+i shortcut to show the Inspector
- select the "Attributes Tab"
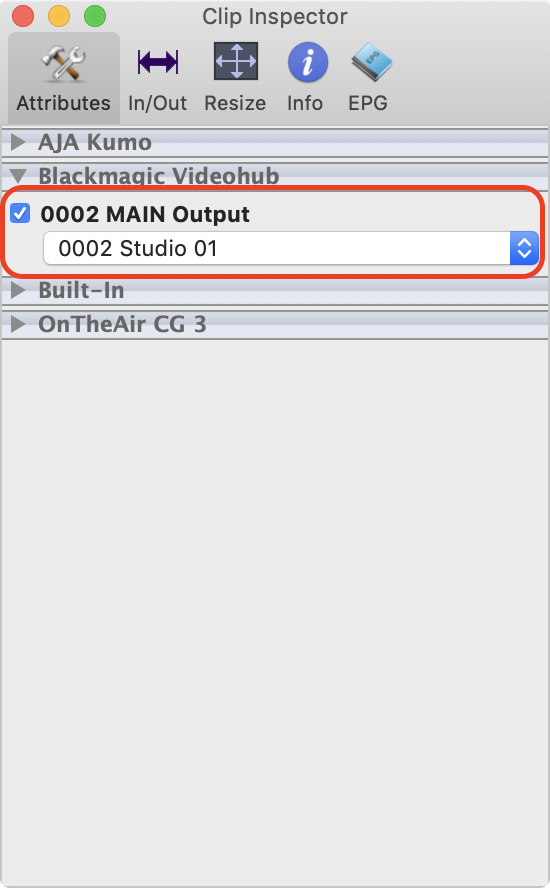
- you should see a section called "AJA Kumo", "Blackmagic ATEM", "Blackmagic Videohub", or "OnTheAir Switch". Depending on what you configured. Toggle it open.
- tick the checkmark in front of the MAIN output
- select another input for your Live (this will be the signal coming from your studio)
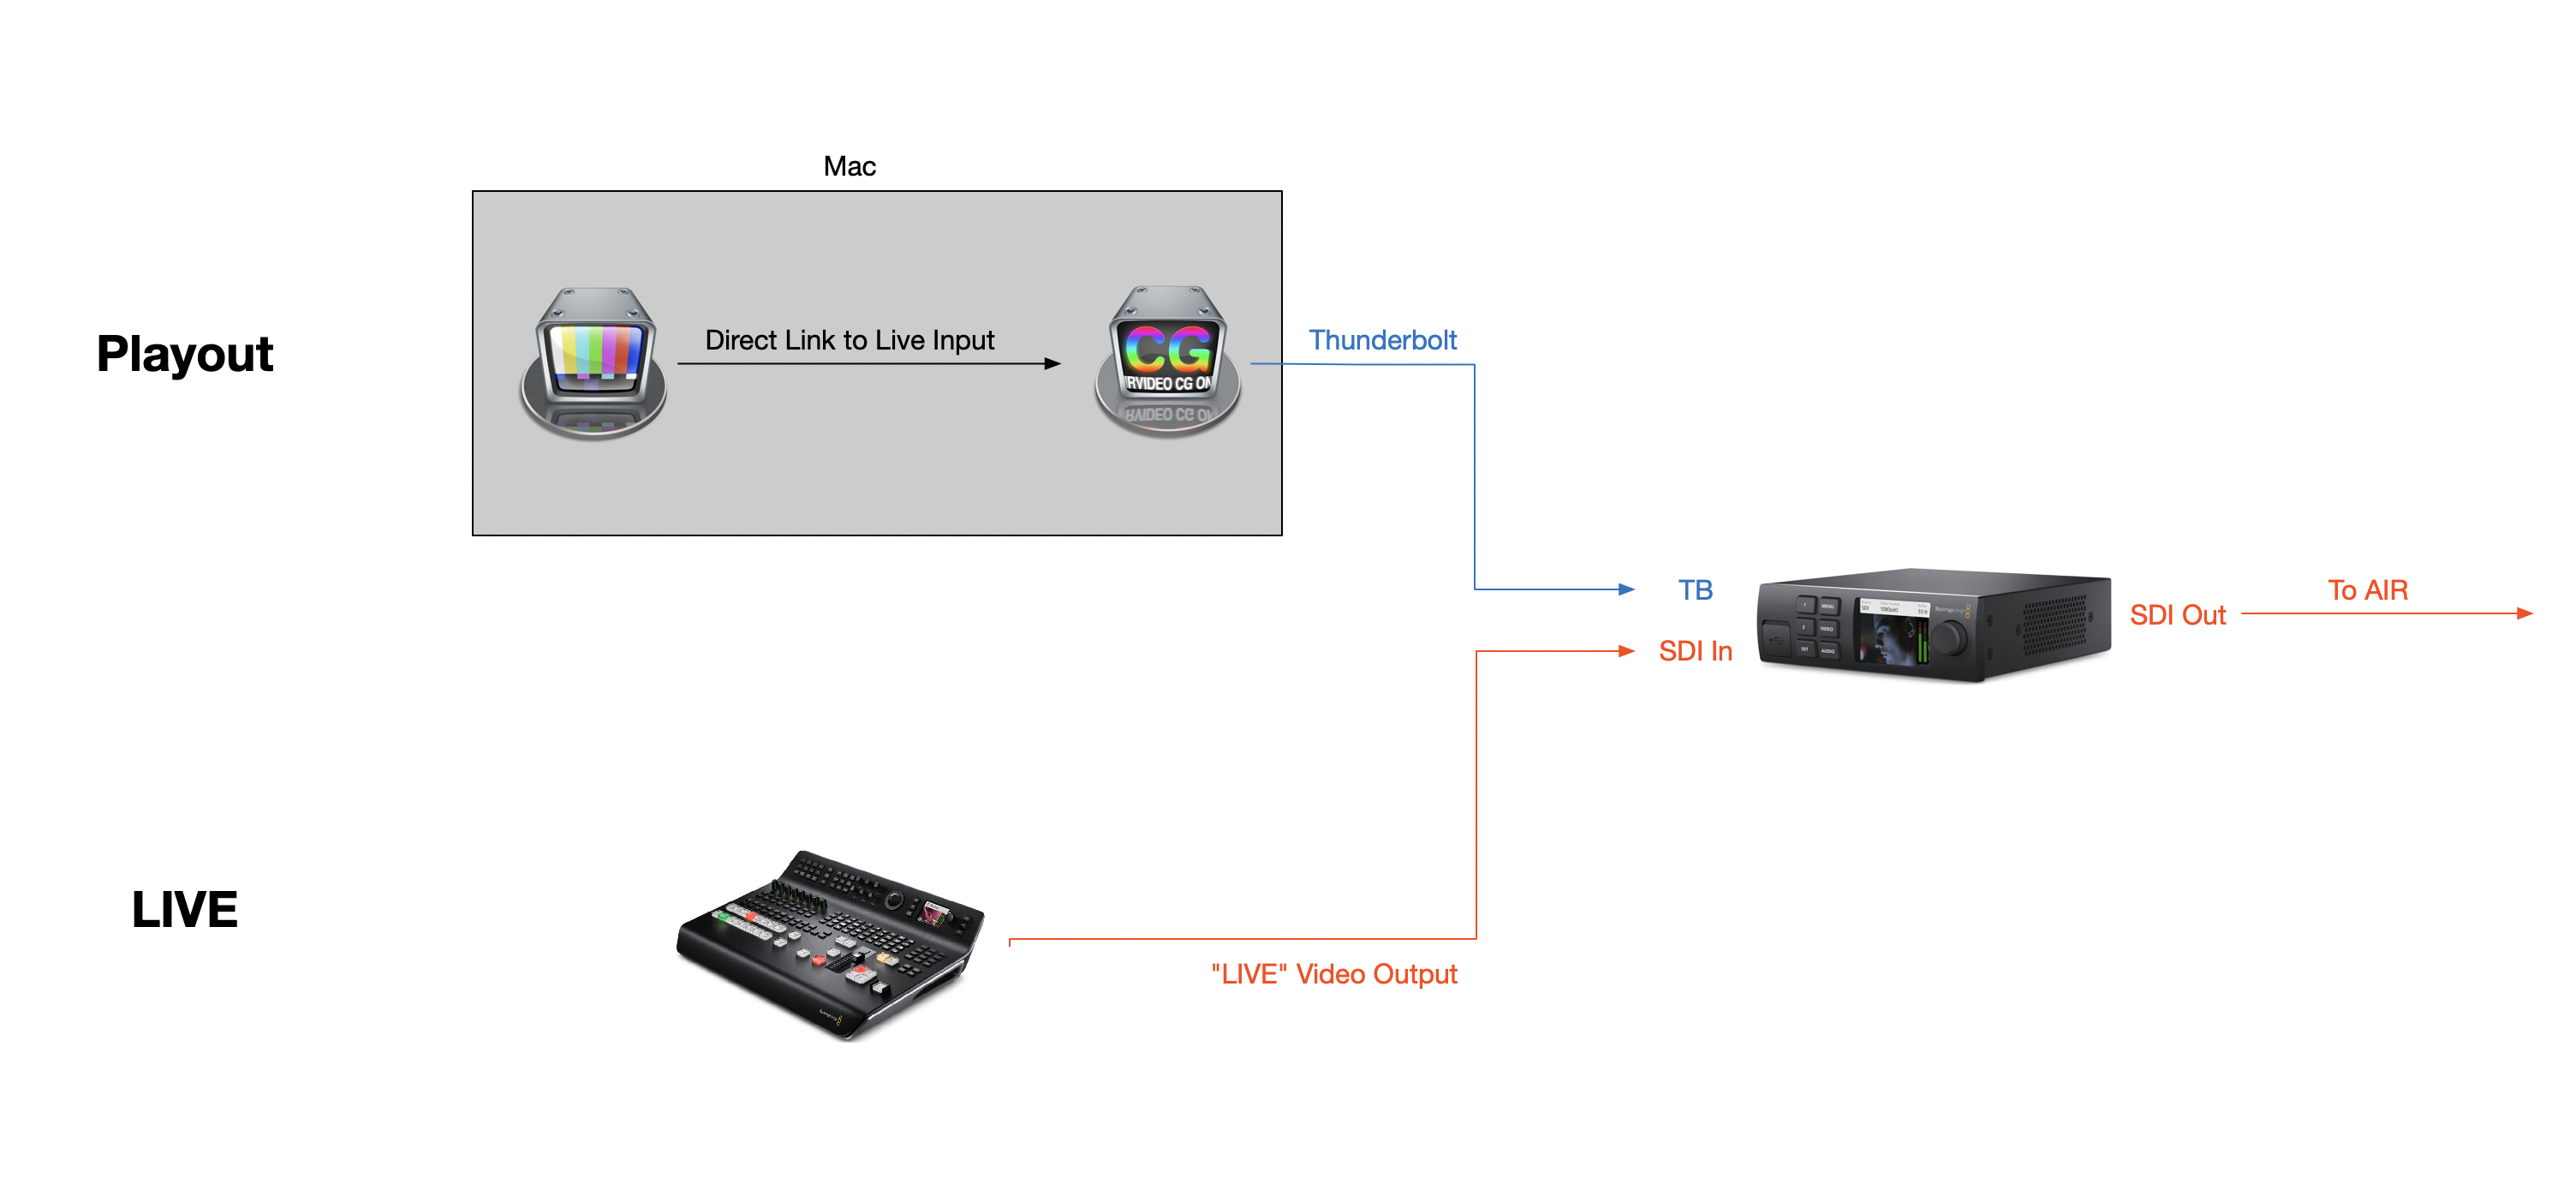
- the input of a video device
- the signal coming from another Softron application running on the same Mac and using the "direct link"
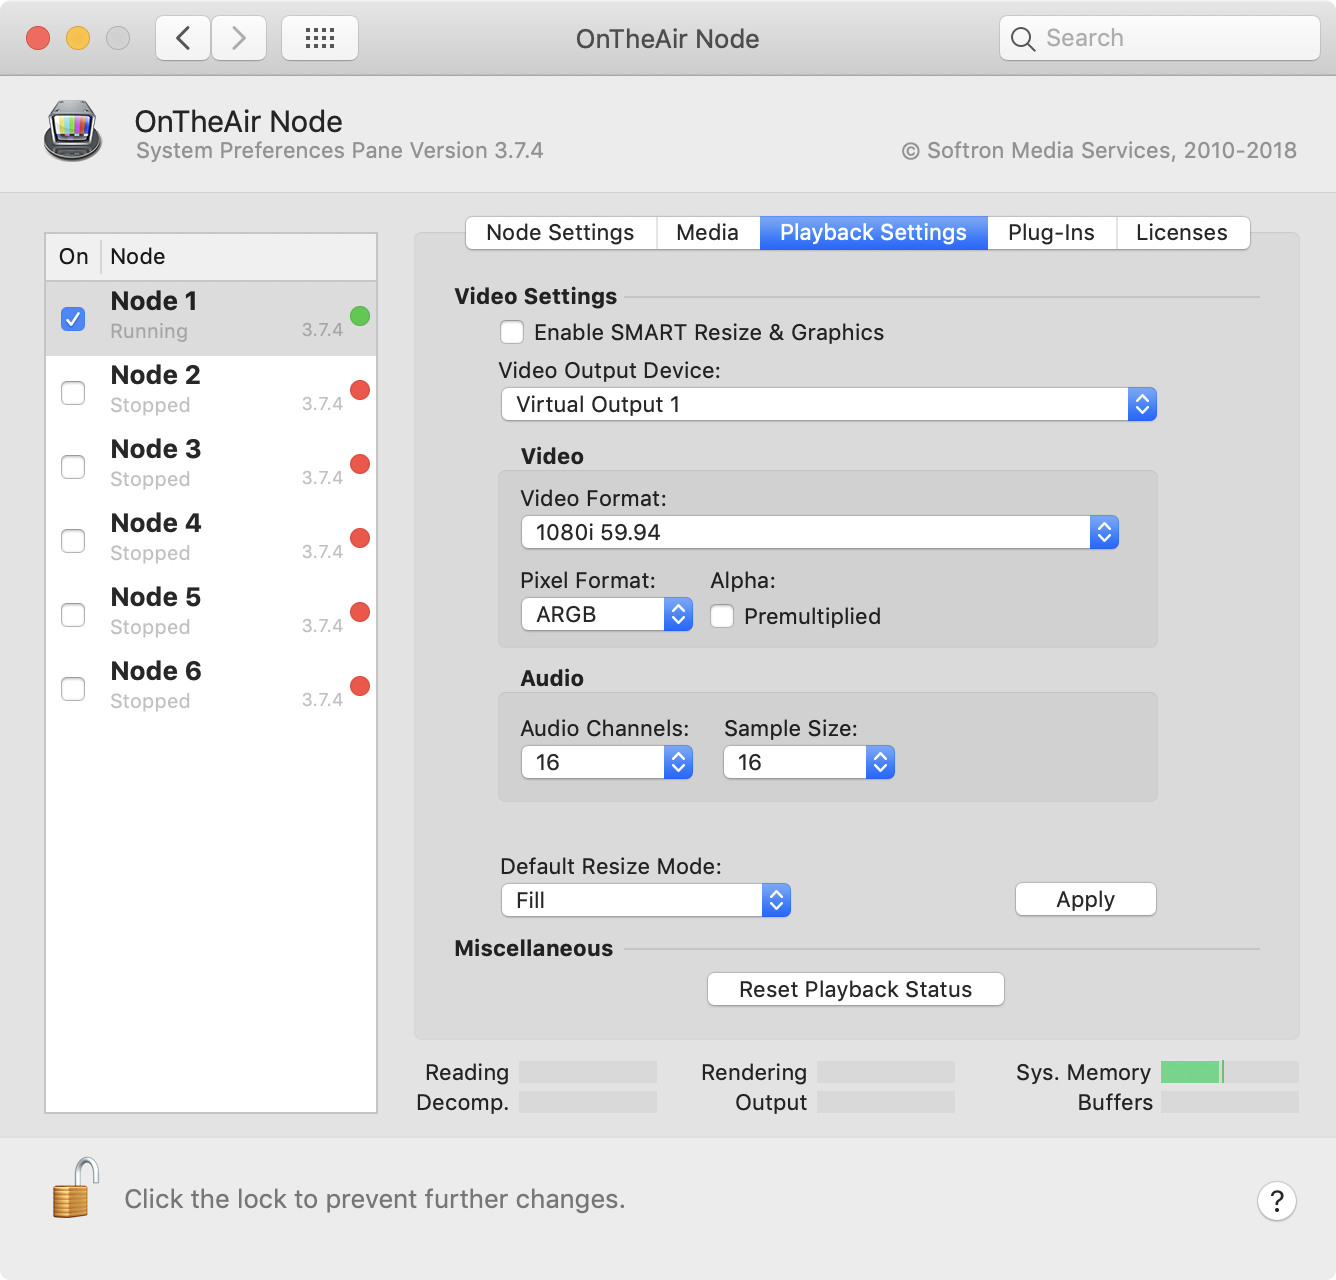
Setup OnTheAir Node playback settings
Prepare the OnTheAir CG Projects
- In OnTheAir CG Designer:
- create 2 Live Sources (in preferences). For example one called "SDI input", the other one "Node".
- create 2 projects, in one of the 2 projects, use the "SDI Input" Live, and in the other project, use the "Node" input.
- In OnTheAir CG Server:
- create the same 2 live sources in preferences. Again they must use the same name as the one created in OnTheAir CG Designer.
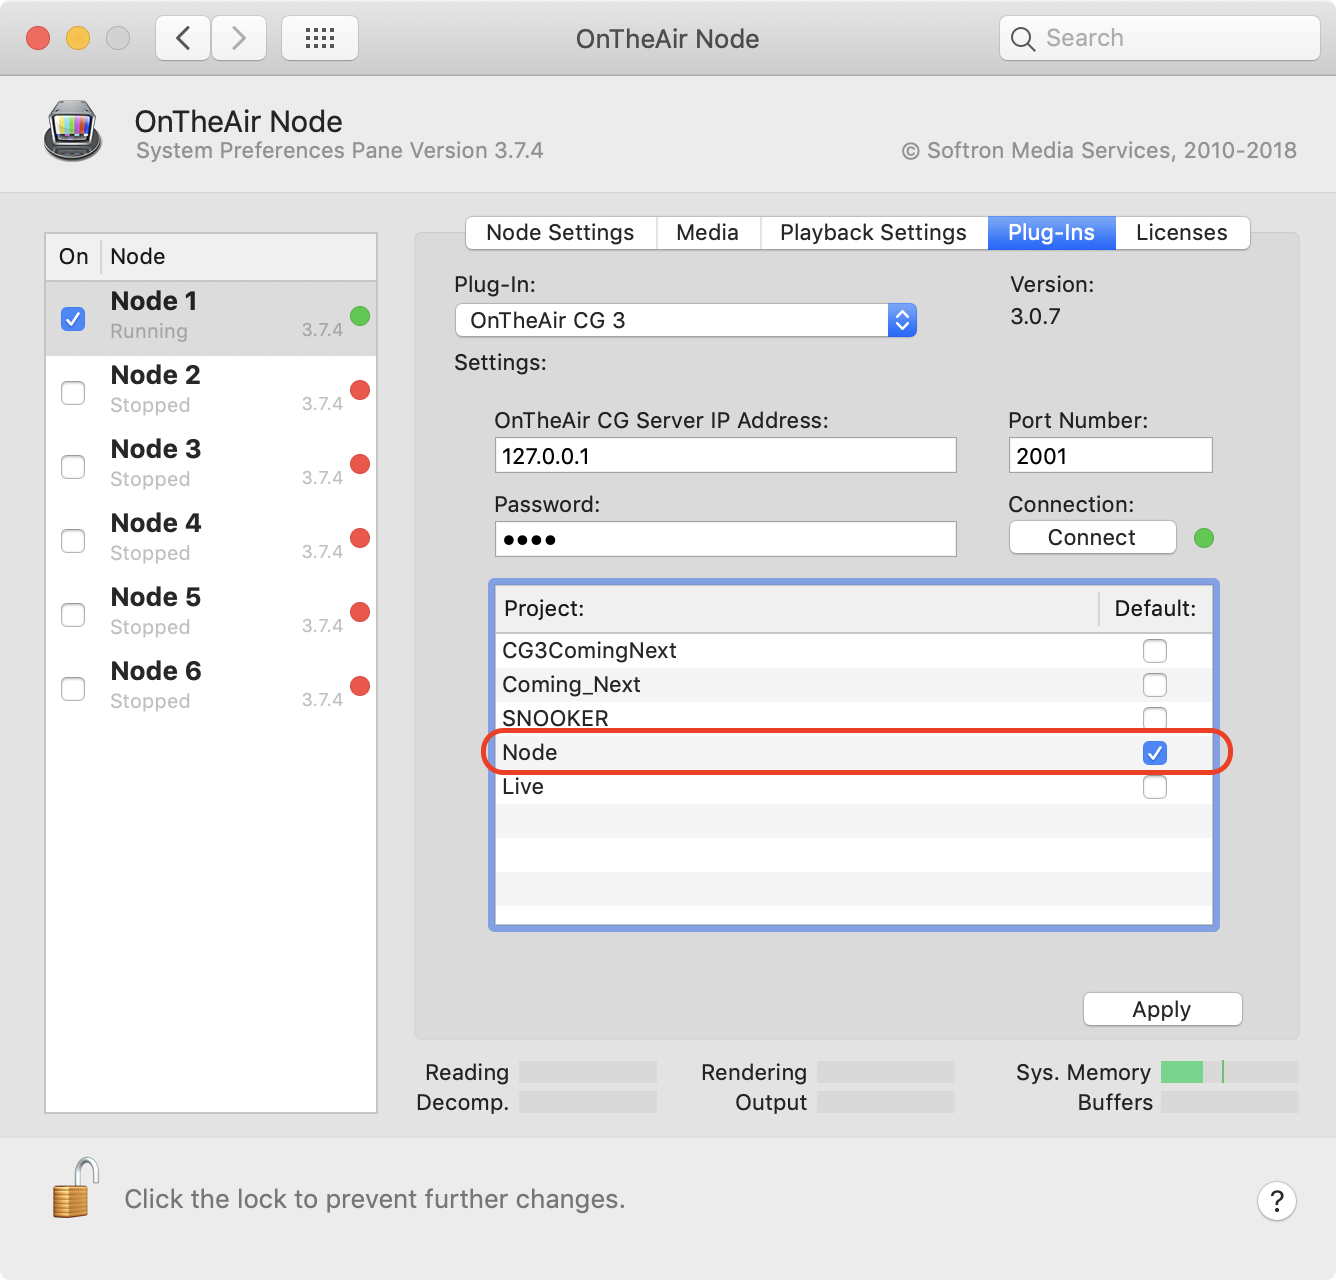
- Add the 2 projects you have created: the one using the SDI input at the bottom of the list, and the one with Node just above. All other projects must be above these 2 projects.
Setup OnTheAir Node CG plugin
Attributes for Live clips using OnTheAir CG
Now, in OnTheAir Manager, you have to create a Live clip (see below for instructions) and change its attributes, so that the "Node" project is stopped and the "Live" project is started.
To set the attributes of a Live clip in OnTheAir Manager:
- select a Live Clip in the Media Browser (you can select multiple clips at once). Note that if you change the attributes in the Media Browser, it will be applied automatically to all Live clips, but if you change the attributes in the events and playlists, the change will only be for that specific occurence and changes made in the Media Browser won't impact).
- double-click on it or use the cmd+i shortcut to show the Inspector
- select the "Attributes Tab"
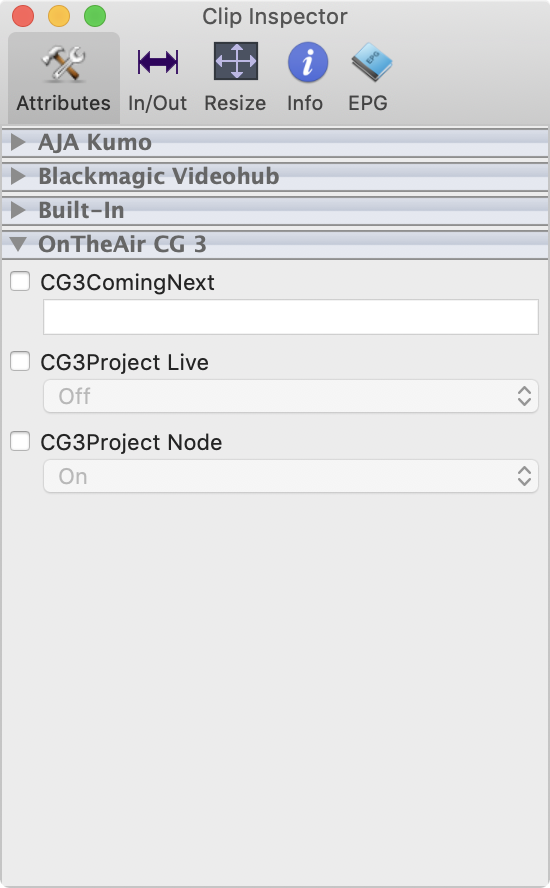
- Open the . If you did not change anything it should look something like this (note that the attributes here a listed in the alphabetical order, not the order of projects in OnTheAir CG Server). The "Live" project is off, and the "Node" project is on. That's what will work for all clips.
- For Live clips, set it so that the Live project is on, and the Node project is off:
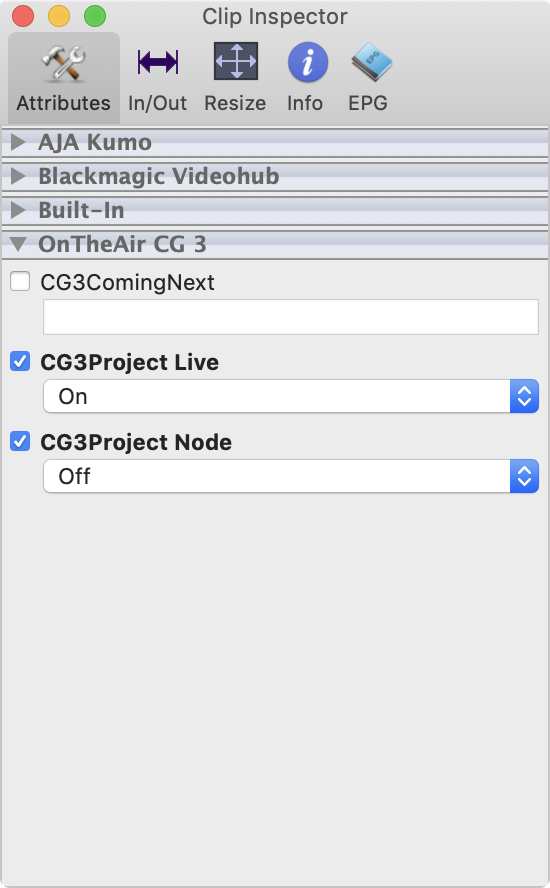
That's it! Now when OnTheAir Node will play that Live clip, it will stop the Node project, and start the Live project showing the signal getting in your video device.
Handling the transition between the Live and Node projects
Note that there can be a few frames of black in the transition between a "Live" project and the "Node" project. The reason is that OnTheAir CG will start the "Node" project even before the Node had a chance to start playing back. This is something we will improve in the future, but in the meantime, there are 2 possible workarounds:
- on your Live item, add a full screen "Logo overlay" (requires the Smart Resize and graphics option to be enabled). And when ending your live show, make sure that you end with the exact same image, so the switch between the 2 will be seamless
- the other workaround is to use the alpha channel of OnTheAir Node. For this, make sure that:
- OnTheAir Node outputs using ARGB
- the "Node" project is above the "Live" project in OnTheAir CG Server
- the default status of the "Live" project is set to on
- on a Live show, you only change the attribute of the "Node" project to stop it during the Live show. That way, when the Node project will start, even if there are a few black frames, as they will be transparent, the Live project will still be seen.
- WARNING: this means that the Live project will run all the time, and if the video won't be seen, audio might be heard, so make sure that there is no more audio sent to the input.
In OnTheAir Manager, select a Live Clip in the Media Browser and double-click on it or use the cmd+i shortcut to show the Inspector. Select the "Attributes Tab", tick the checkbox in front of "Audio Source" and make sure to select "Input" instead of "Player" as shown in the screenshot below:
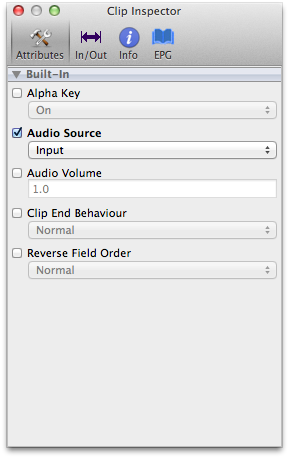
This will ensure that during the Live, the sound that will be heard will be the sound that is getting in the input of the card and not the sound of the clips played by OnTheAir Node, but of course when you are playing video clips you want to hear the sound of your clip and thus you should make sure that the Audio Source is set to "Player" when it is not a Live.
HOW TO Create Live Clips ?
Once you have configured OnTheAir Node as explained above, you can go to OnTheAir Manager and create a Live clip. For that ctrl-click or right-click in the Media Browser and choose "Make Live Clip..."
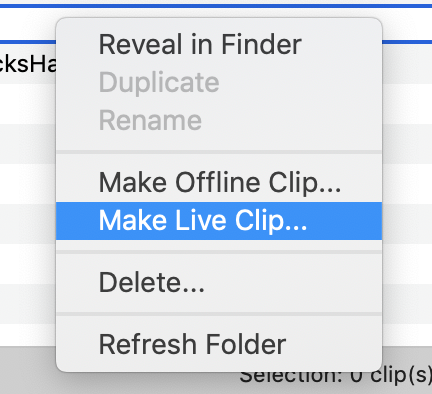
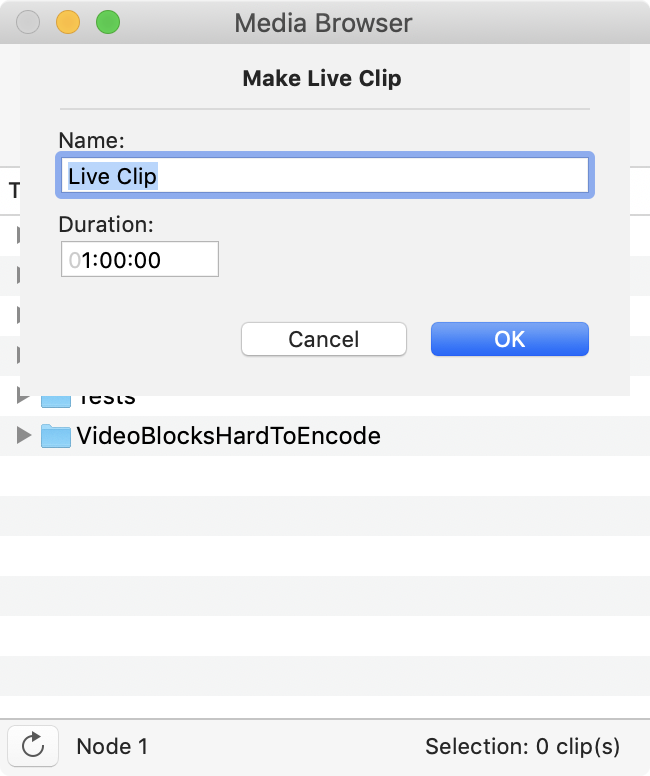
This will open a window in which you will be able to set:
- a name for your Live clip
- its duration
Once the Live clip is created, it will be placed at the root level of your Media Browser and it will NOT be placed within a Media Folder:
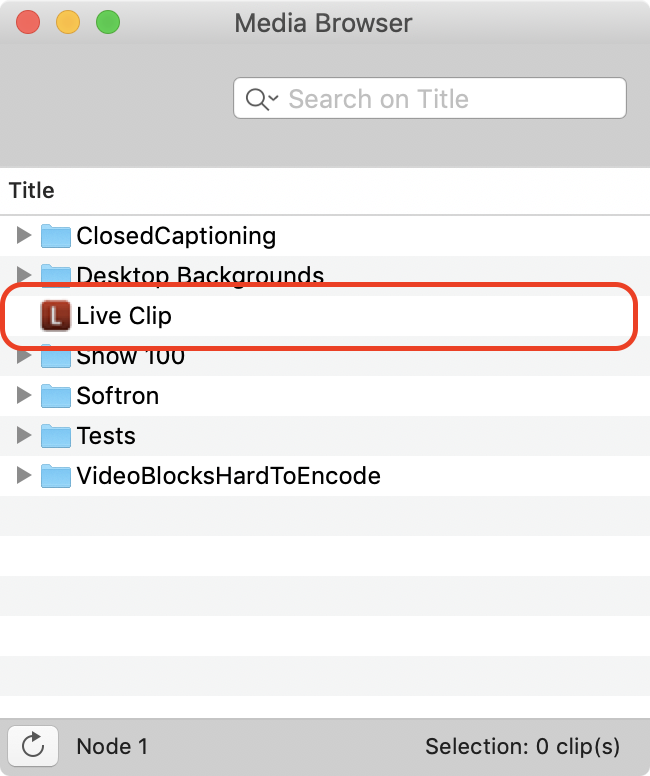
Obviously there will never be a media linked to this clip, it is a kind of placeholder during which no video clip will be played (this is the reason why it is not placed within a Media Folder.
But it is important to know that these Live clips can have the same attributes as a regular video clip, and that is these attributes that will for example control your video router to switch it to a new source.
Remember that if you modify the attributes of a clip selected in the Media Browser, it will be applied to all occurrences of this clip in all playlists, events and schedules, but if you modify the attributes of a clip from one of its occurrences in a playlist or event, the attribute will only be applied for this occurrence and will not impact the others. This means that for a Live clip (as obviously you will always want it to have the same behavior), you must modify its attributes from the Media Browser. Make sure to select it from there before applying its Attributes.
Use your Live clip as a regular video clip
Using a Live event in playlists and events is very easy, just drag and drop the Live clip in a playlist or event as a regular clip. When you will send that schedule to a OnTheAir Node, and that it will play the Live event, the card will be in Loopthrough and you will see the signal that is getting in the input.
Recommended articles to go further
Attributes are very powerful tools that may take a little bit of time to configure, but once set, it is very quick to use, specially when you use the categories. Toi understand a bit more what are plugins and attributes, you can read these articles:
https://softron.zendesk.com/entries/20628861-what-s-a-plugin-for-ontheair-node
https://softron.zendesk.com/entries/20646993-what-are-attributes-in-ontheair-node
Comments
0 comments
Please sign in to leave a comment.