1. Prerequisite
This article is only for Closed Captioning CEA 608 and CEA 708 embedded in a QuickTime file. We also support OP47 and have other options (such as MXF, SRT, ...). You can read more about this here.
Disclaimer: We mention a few third party solutions here, but we are not related to them, and won't be able to provide support on those, nor guarantee the way they work. The info we give here is just to guide you and help find a solution, if you have more questions regarding those third party solution, please get in touch directly with them.
2. Differences between CEA-608 and CEA-708
We found one of the best explanation on this an old Apple documentation for Final Cut Studio. Here is the part coming from there:
Closed captioning is encoded in a variety of ways, depending on the video format.
-
SD analog and digital NTSC broadcast, tape, and DVDs: Closed captioning for SD analog television is a text-only data stream that’s encoded into line 21 of an NTSC video signal. This is one of the reasons for the series of blinking dashes and lines that runs along the edge of a video image when you put a monitor into underscan mode. SD digital video uses the CEA-608 standard of closed captioning, which can be encoded into an MPEG-2 stream. Because closed captioning is encoded right into the video signal, it can be included and recorded on videotapes; broadcast over the air, via satellite or cable; included on DVDs; and even recorded using digital video recorders (DVRs) such as TIVO.
-
SD and HD digital television broadcast and tape: Although high definition television (HDTV) originally supported line 21–style closed captioning, the proliferation of new HD digital video formats necessitated a new approach. To accommodate HD video encoded using a variety of methods, the EIA-708 closed captioning standard for ATSC digital television was developed. This standard has since been superseded by CEA-708, which covers both SD and HD digital television. In this standard, closed captioning data is stored in the vertical ancillary (VANC) data of a digital video stream. Final Cut Pro and Compressor both support the embedding of CEA-608 closed captioning within the CEA-708 standard.
-
European television: Closed captioning in European television is based on teletext, a text-only information retrieval system for television originally developed in England. Digital broadcasters in Europe currently use the DVB-T and DVB-S standards for encoding teletext-style data into digital video streams.
3. Transcribing Closed Captioning
When talking about Closed Captioning, or Subtitling, the first thing you'll need to do is transcribe. You can either:
- Ask someone else to do it. There are many online services that can do that for you, such as AutomaticSync, or 3PlayMedia, or many others. The idea is that you will send them your video, and they will send you back either
- just a subtitle file which is basically a text file with time information. There are many formats available such as .scc or .srt. You will use that subtitle file in a software to generate the Closed Captioning in the format you want.
- some service even offer the ability to receive a video file with the Closed Captioning track.
- Do it yourself. For that you will need to listen to your video, add the text when needed, position it correctly (not in front of some possible on screen text), etc.... You can do that directly in your editing solution, or with a third party solution such as MacCaption. This is a long process so, even though these third party services are not free, they can be really useful.
4. HOW TO: Create compatible files for HD
There are multiple ways to create files with Closed Captioning that will work with our playout applications. Some editing solutions allow you to export with Closed Captioning. Below are a few solutions that we've heard off, but there could be others. Don't hesitate to add a comment if you've heard of other good solutions.
4.1. With MovieRecorder
MovieRecorder also has a Closed Captioning option available that allows it to record the Closed Captioning. But this works only if you have a video signal with Closed Captioning in it, and MovieRecorder will be able to create a file with a QuickTime CEA-708 Closed Captioning track. You can find more info about this feature in the following article: https://softron.zendesk.com/hc/en-us/articles/115000023114-HOW-TO-Do-Closed-Captioning-with-MovieRecorder
4.2. With Adobe Premiere
In Adobe Premiere, you can create and edit Closed Captioning directly in the application. You can check the following article for instructions on how to handle Closed Captioning with Adobe Premiere: https://helpx.adobe.com/premiere-pro/using/working-with-captions.html
To ensure compatibility with OnTheAir Video and OnTheAir Node, follow the guide.
4.2.1. Create new Captions in Premiere Pro
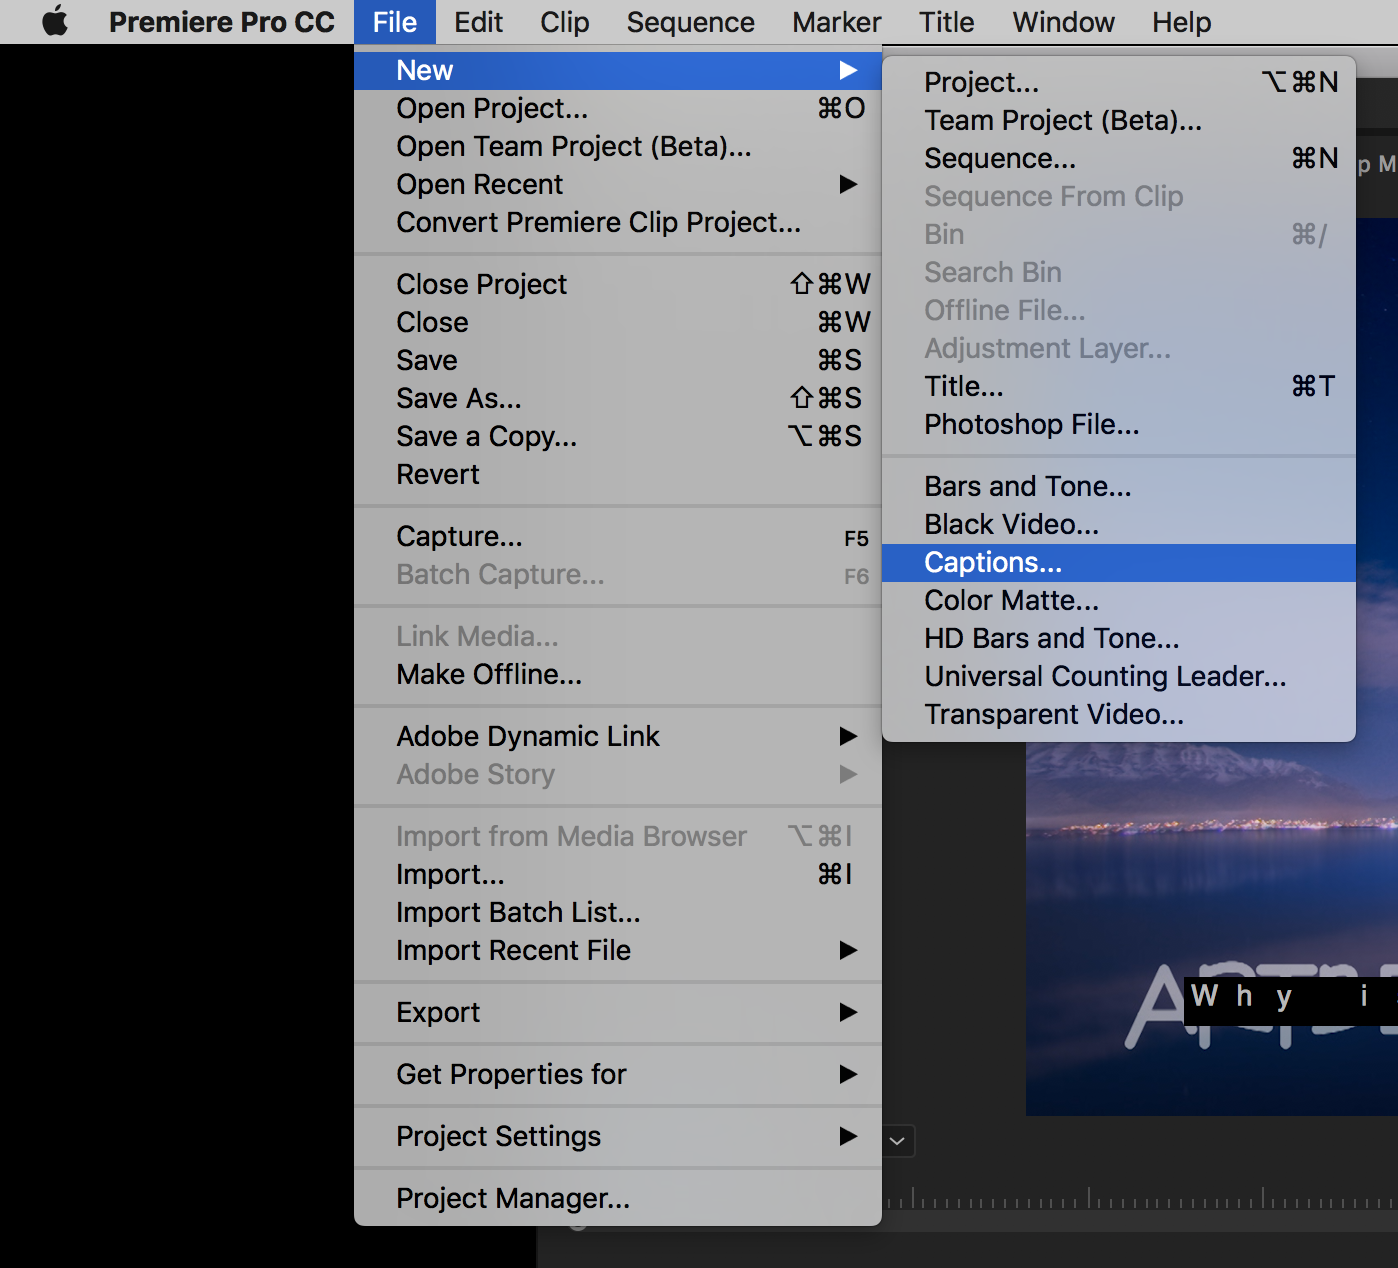
- First create a new Caption item. For that, go to the menu "File > New > Captions..."
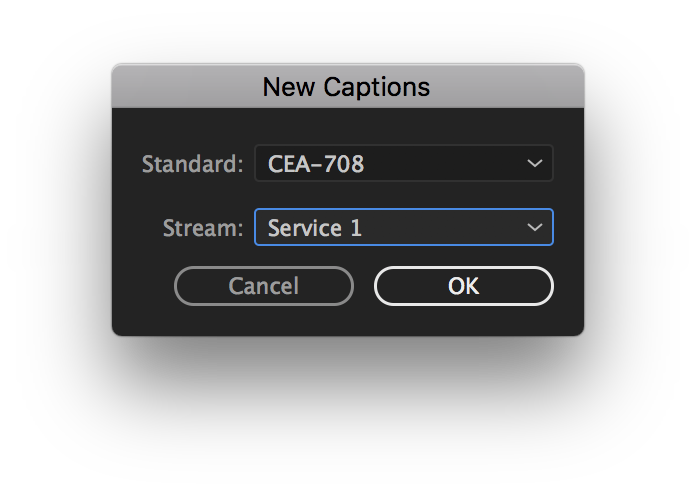
- Choose the Standard to be "CEA-708"
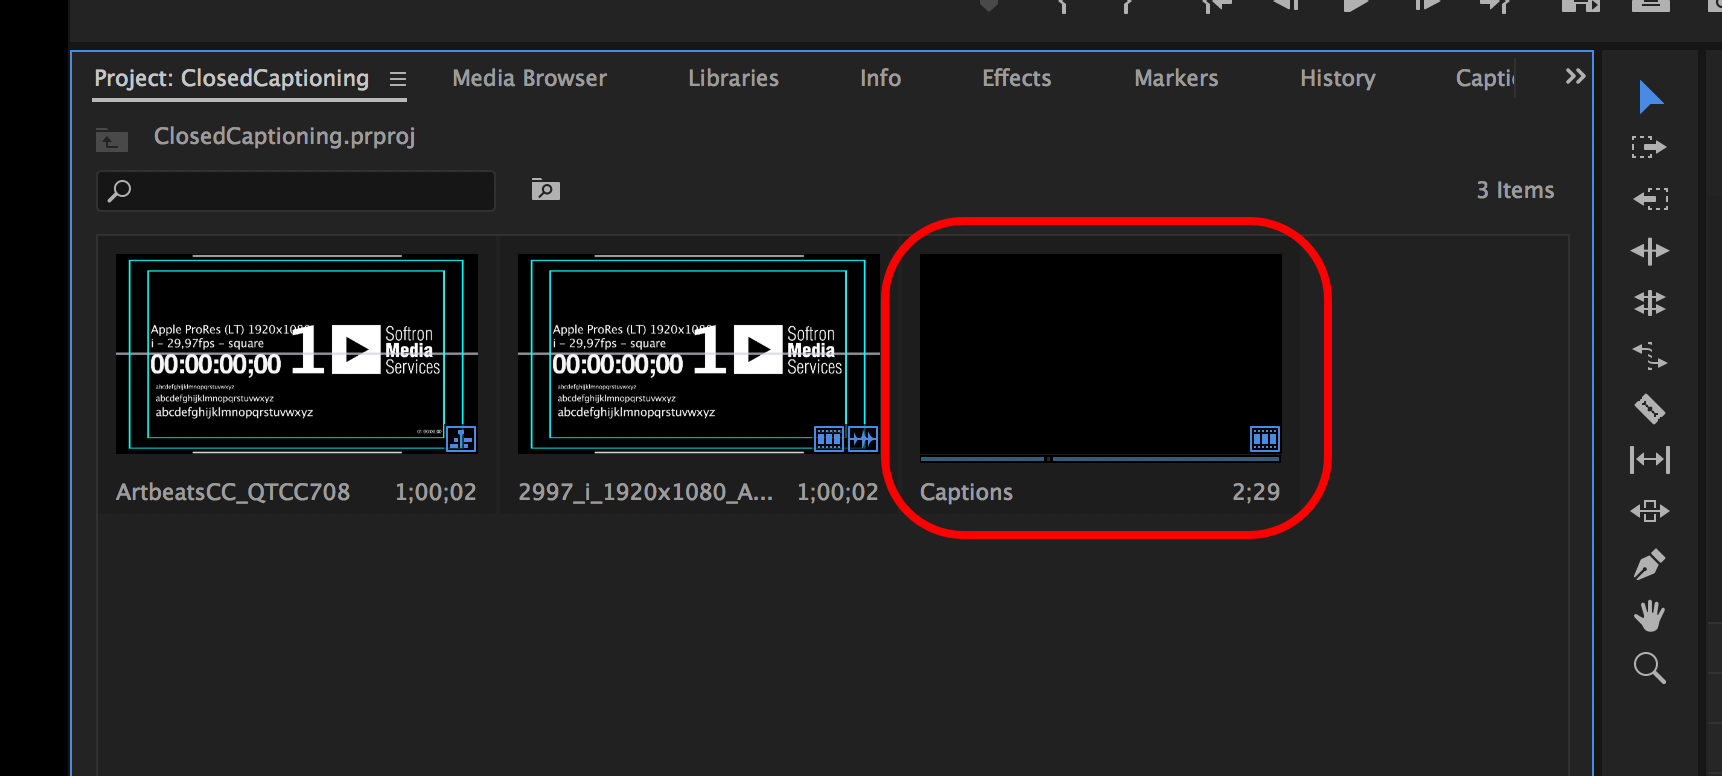
- This will create a new Caption Item in the project browser:
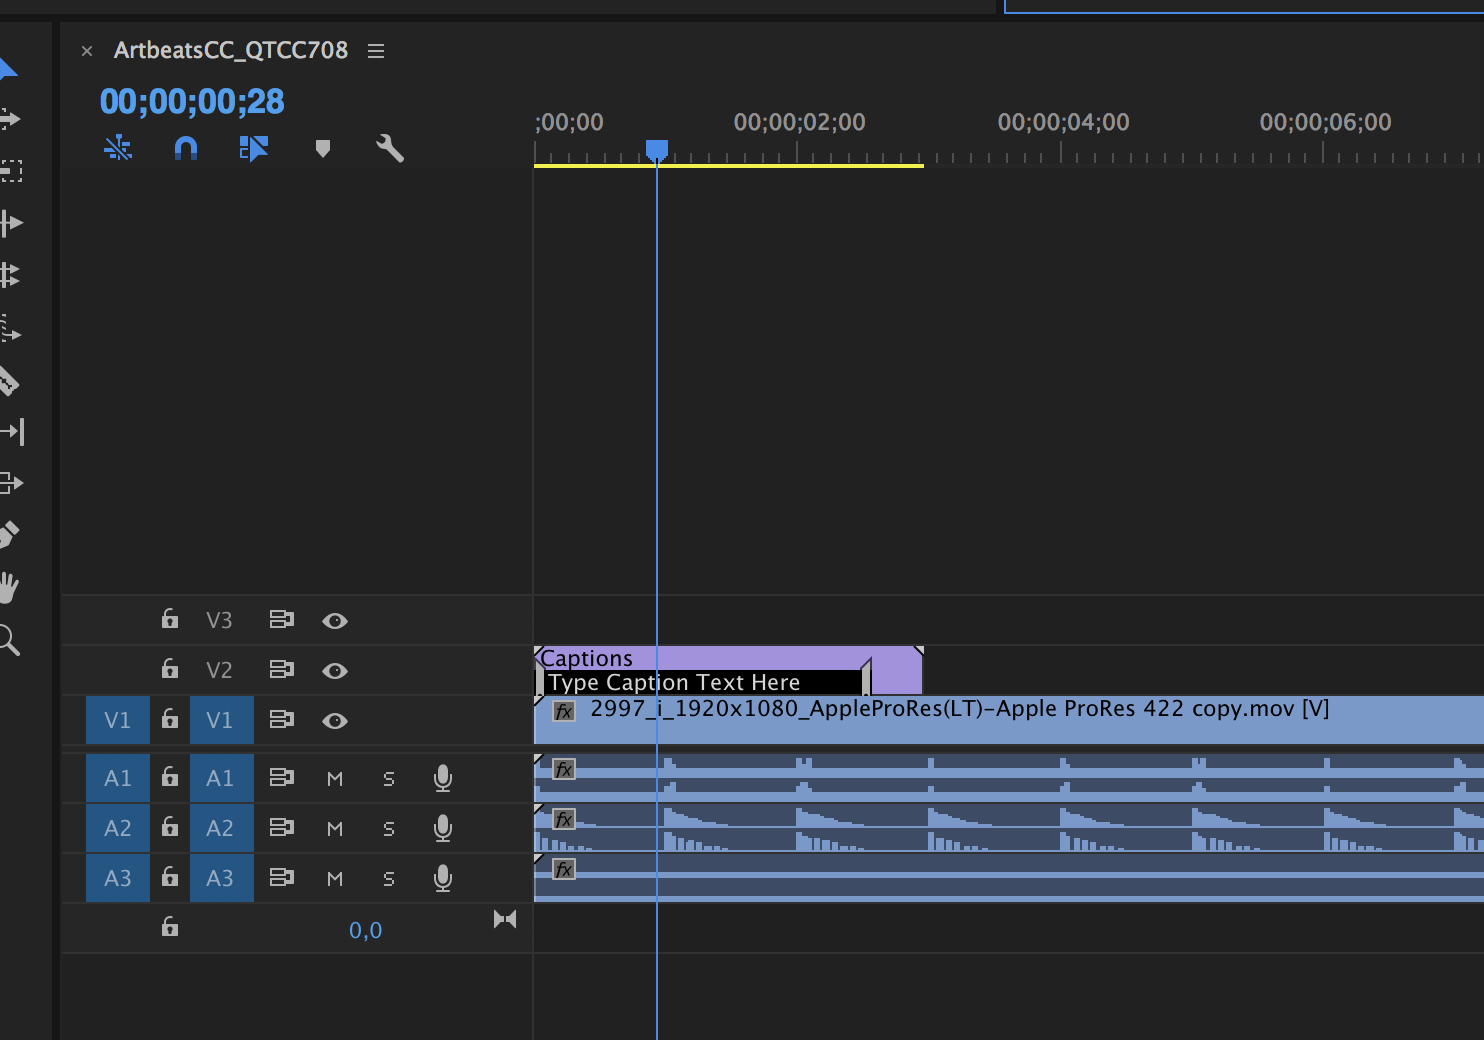
- Drag and drop it in your sequence. It will show as another video track:
- To View how it will look, make sure to turn on the display of the Closed Captioning info by clicking on the wrench icon in the Program pane:
![]()
- Go to the menu "Closed Captions Display", and select "Enable":
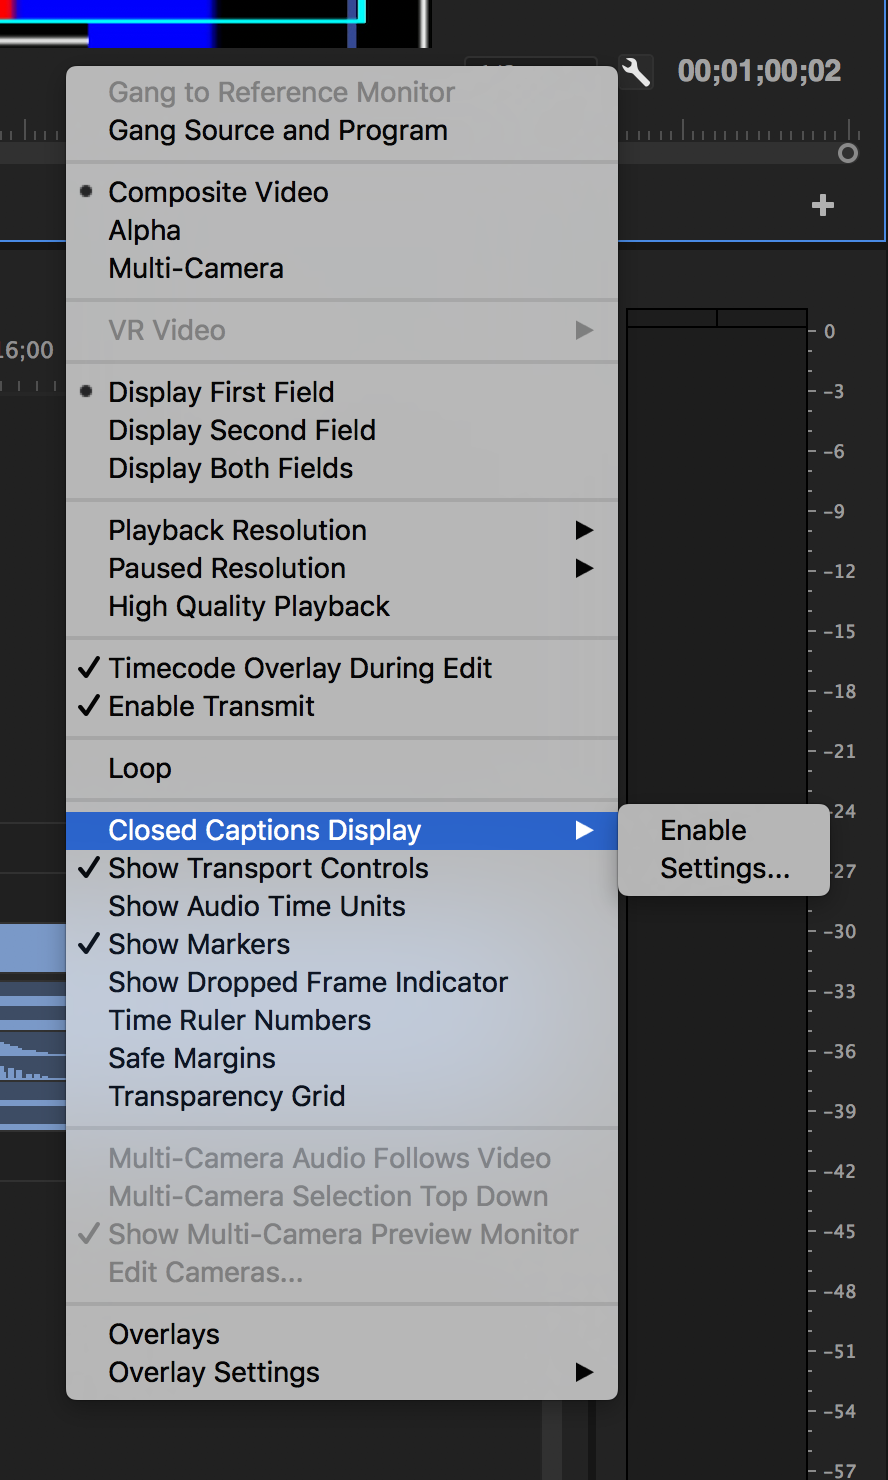
- If nothing shows up, you may need to go back to the same menu, select settings and make sure that it is set to CEA-708, Service 1.
- Then you can go on and edit the Closed Caption. For that, double click on the "Captions" item that you created in the project browser, and this should open this window:
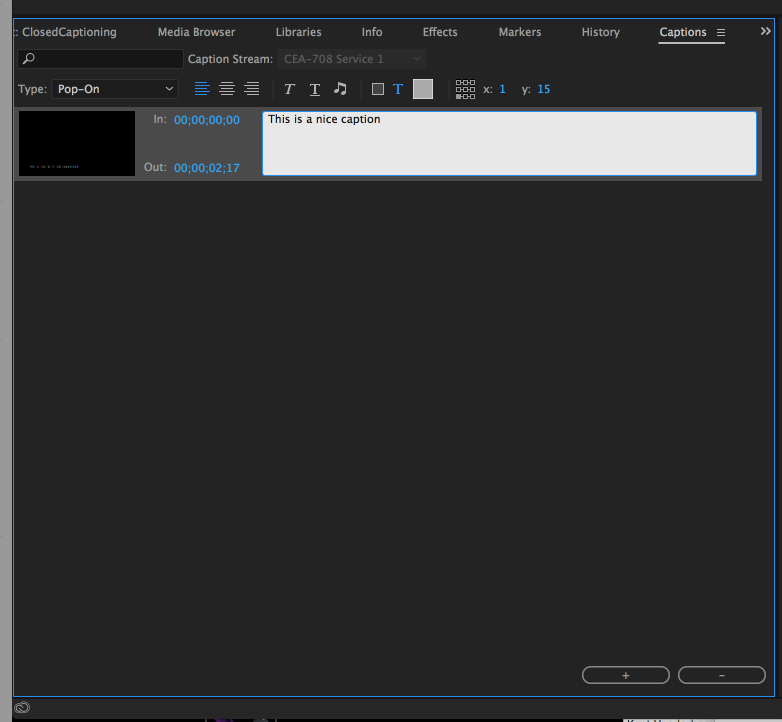
- From there you can, type the text, click on the + icon to add more, edit the text formats, change the duration, etc... When you add more captions, you may need to resize the item duration in the sequence.
Import Captions
If you have used a transcribing service, or have done the captions in a different software, you can import them in Premiere. Just select the menu "File > Import". This will then import the subtitling file and Create a Caption item that you can then use the same way as the ones you create yourself (see above).
Export Captions for OnTheAir Video or OnTheAir Node
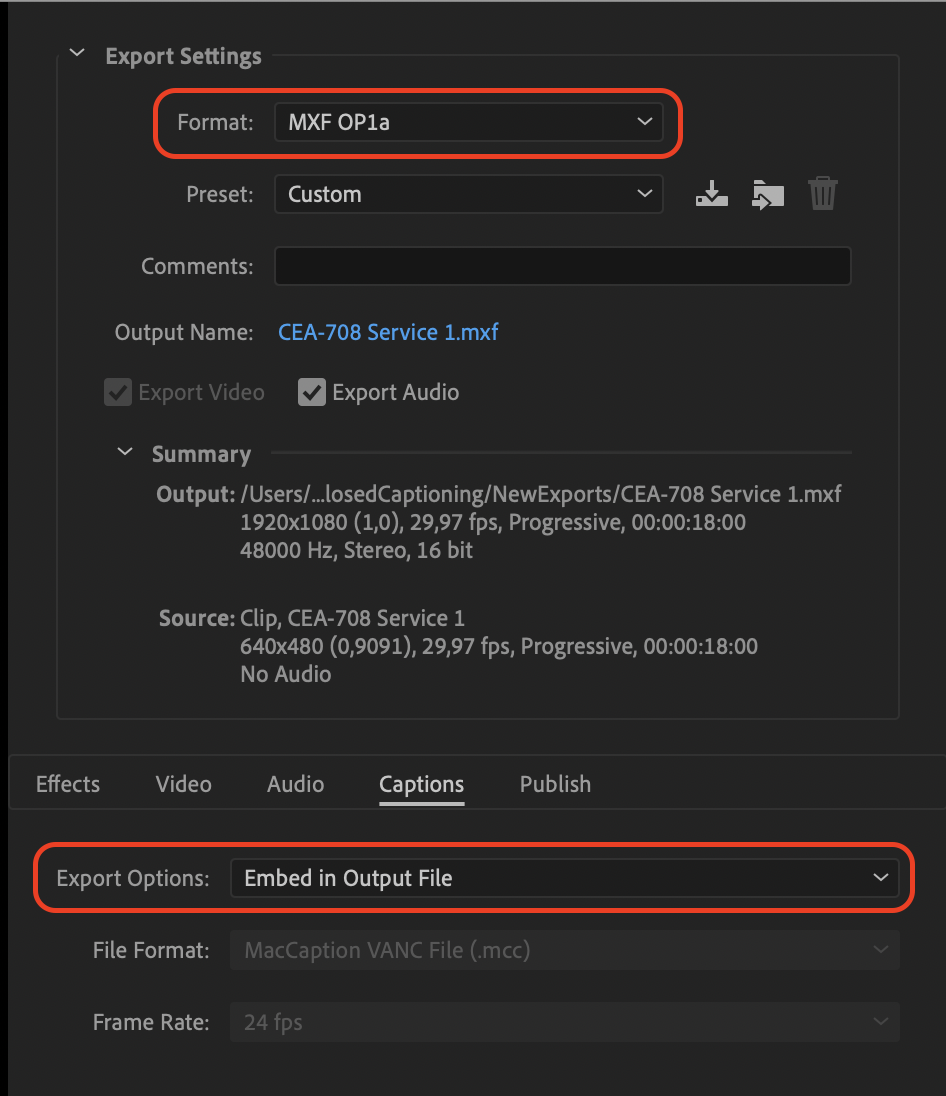
Once your captions are ready, select the menu "File > Export > Media". In the window, make sure that you have selected the format "MXF OP1a" (ou Apple ProRes MXF OP1a), then click on the "Captions" Section, and select the "Export Options" to be "Embedded in Output File":
4.2.2. With Final Cut Pro X
Closed Captions can be created directly in Final Cut Pro X, but currently it only supports CEA608 which, in our playout applications can only work for SD formats.
Apple has some documentation on how to create Closed Captioning in Final Cur Pro X. But again, this won't work as such for compatibility with our playout applications.
For formats higher than SD, if you need to create CEA708 that will work with our playout applications, you can use third party solutions such as X-Title Importer (which will either take your "Titles" and convert those to a subtitle file, or the other way around, import a subtitle file and convert that to "Titles), or SUGARfx subtitles plugin from FcFactory.
Also, if you have a subtitle file (.scc) generated, you can easily associate it with your editing.
When you have finished your editing, select your project and go to the menu "File > Send to Compressor".
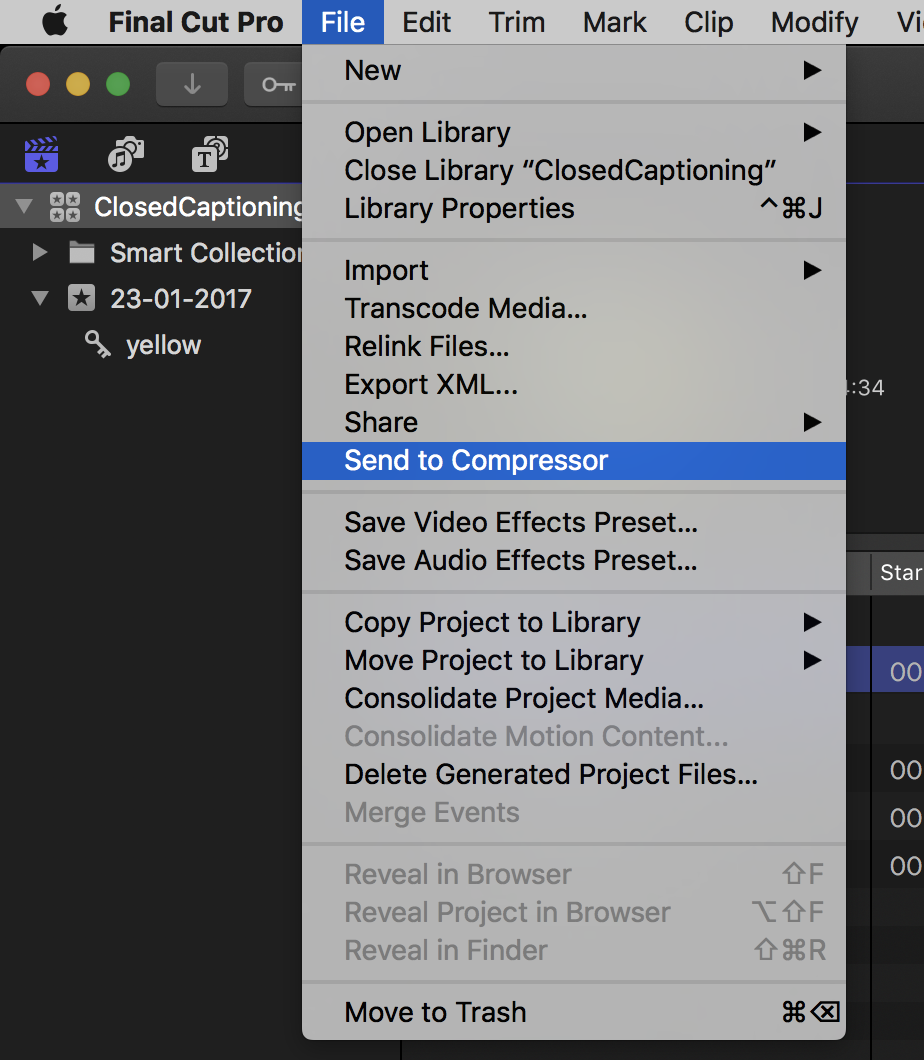
Send to compressor
Make sure that the "job" corresponding to your project is selected (it should have the same name as your project. It should be highlighted in light grey:
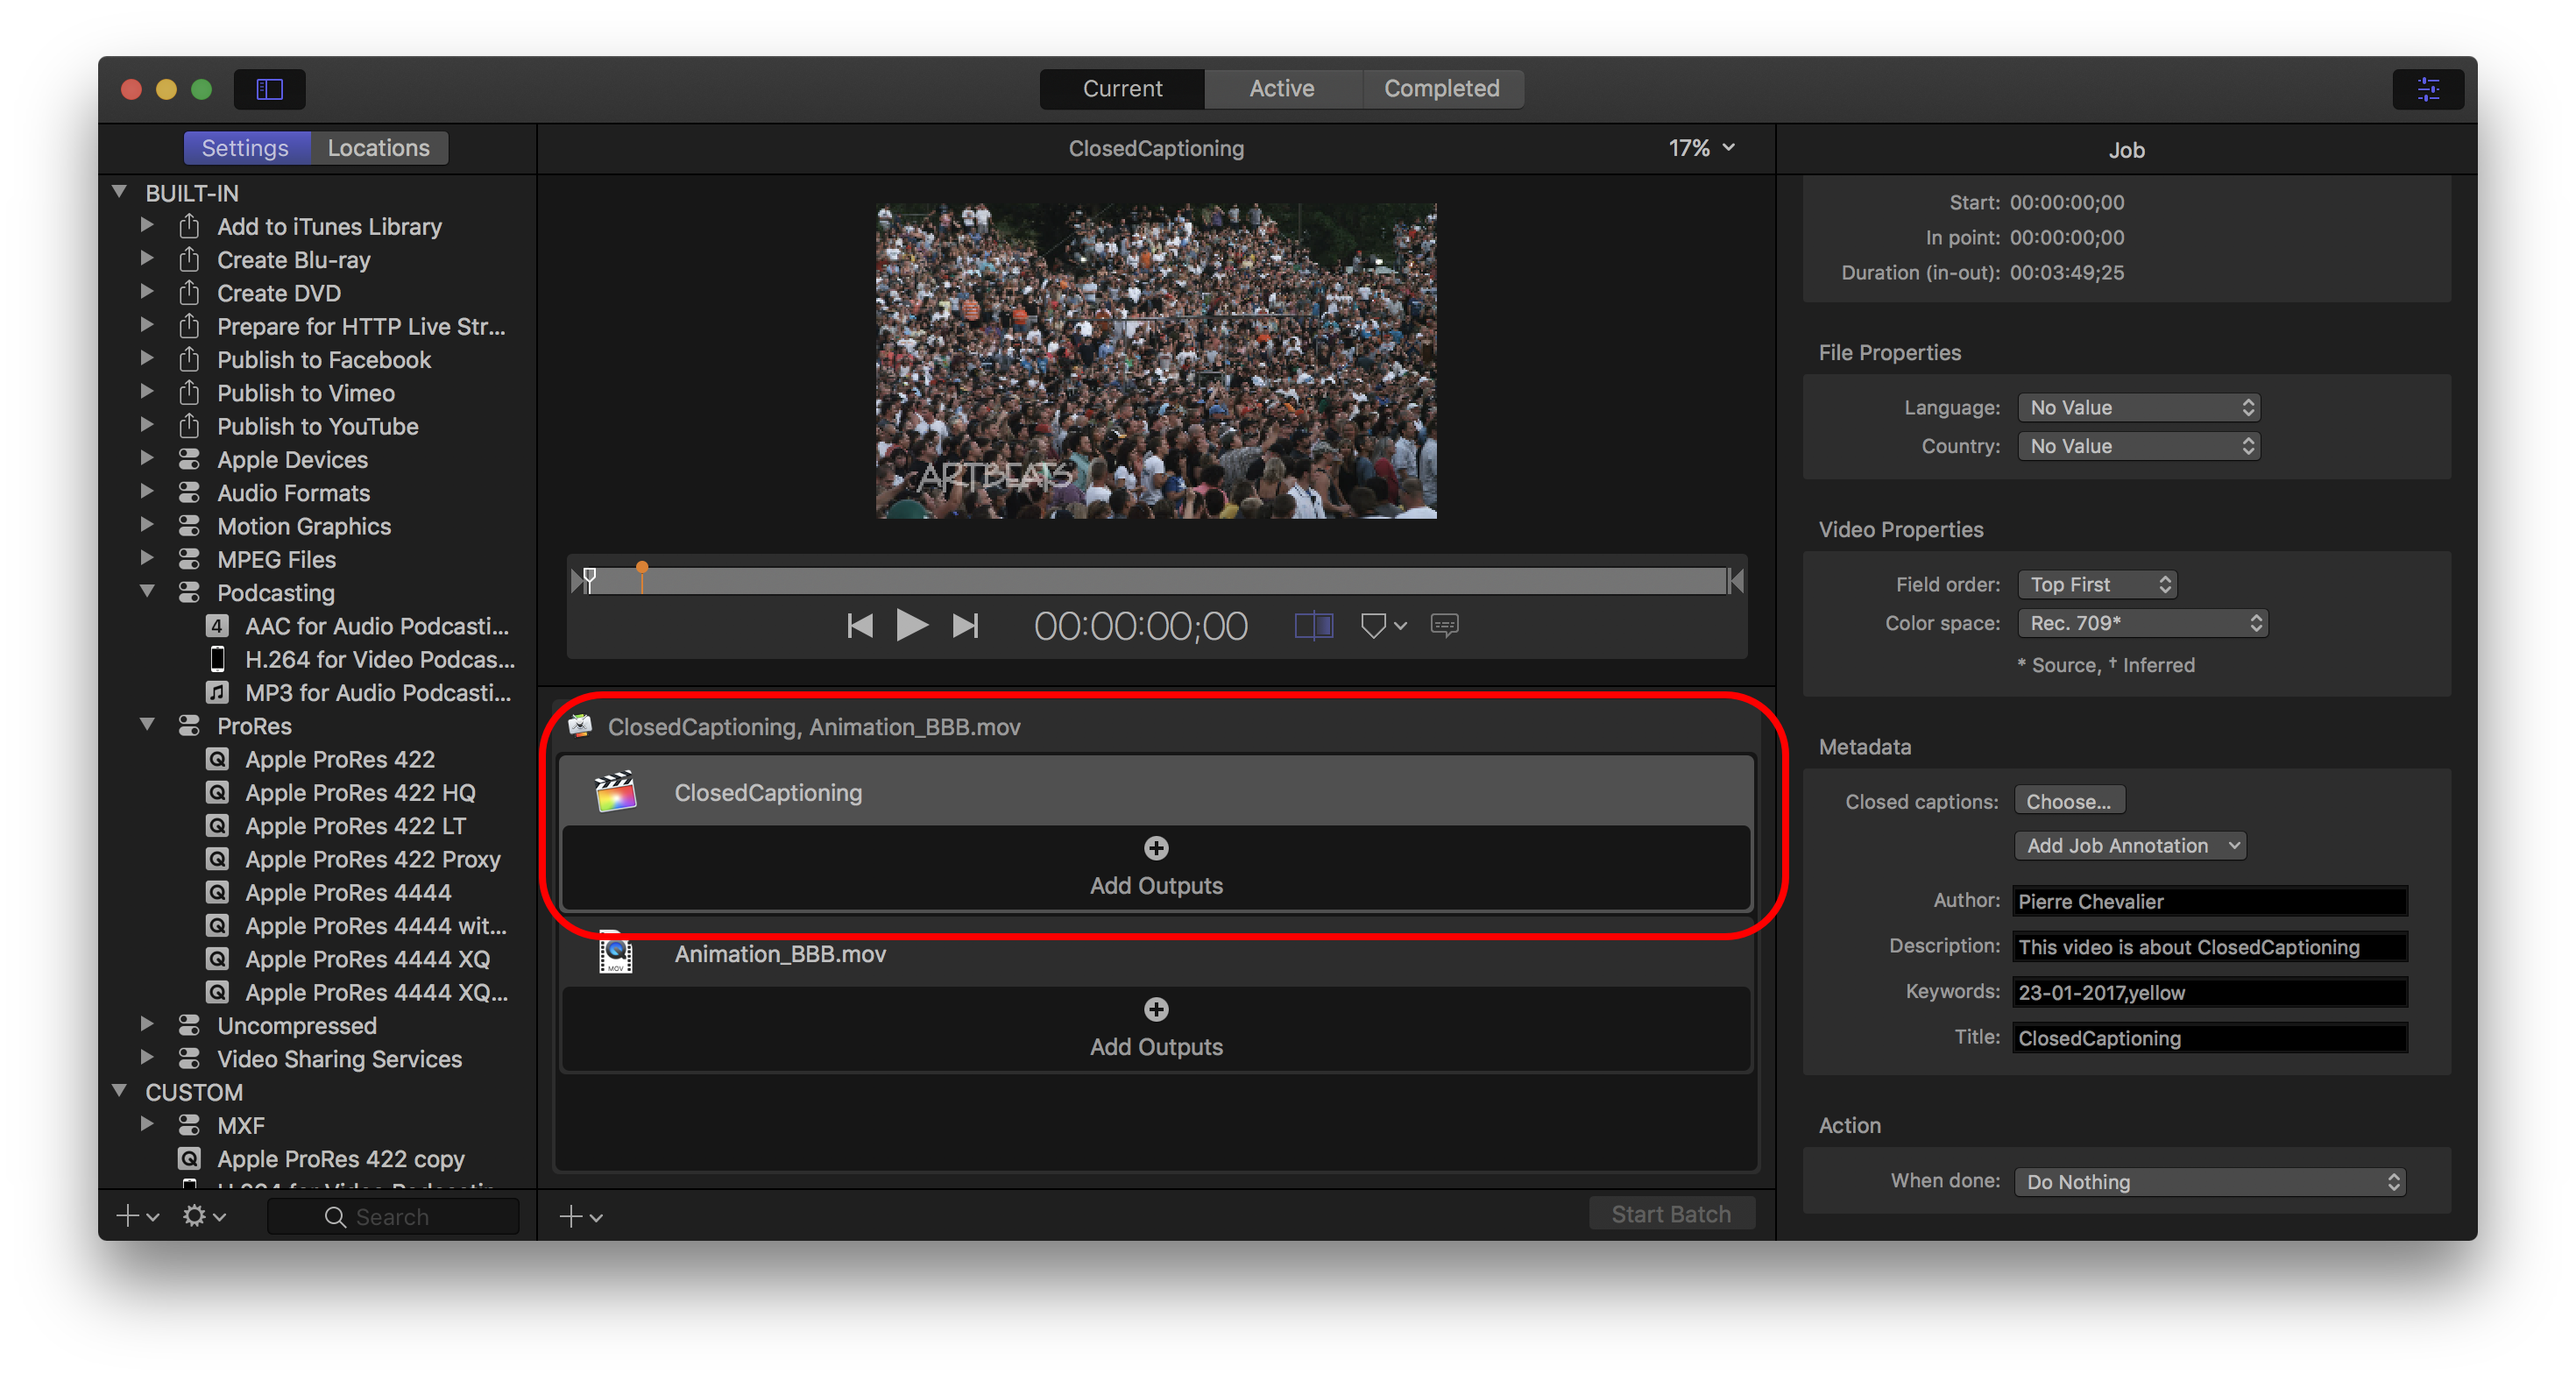
Then in the Inspector, in the "Metadata" section, click on the "Choose" button:
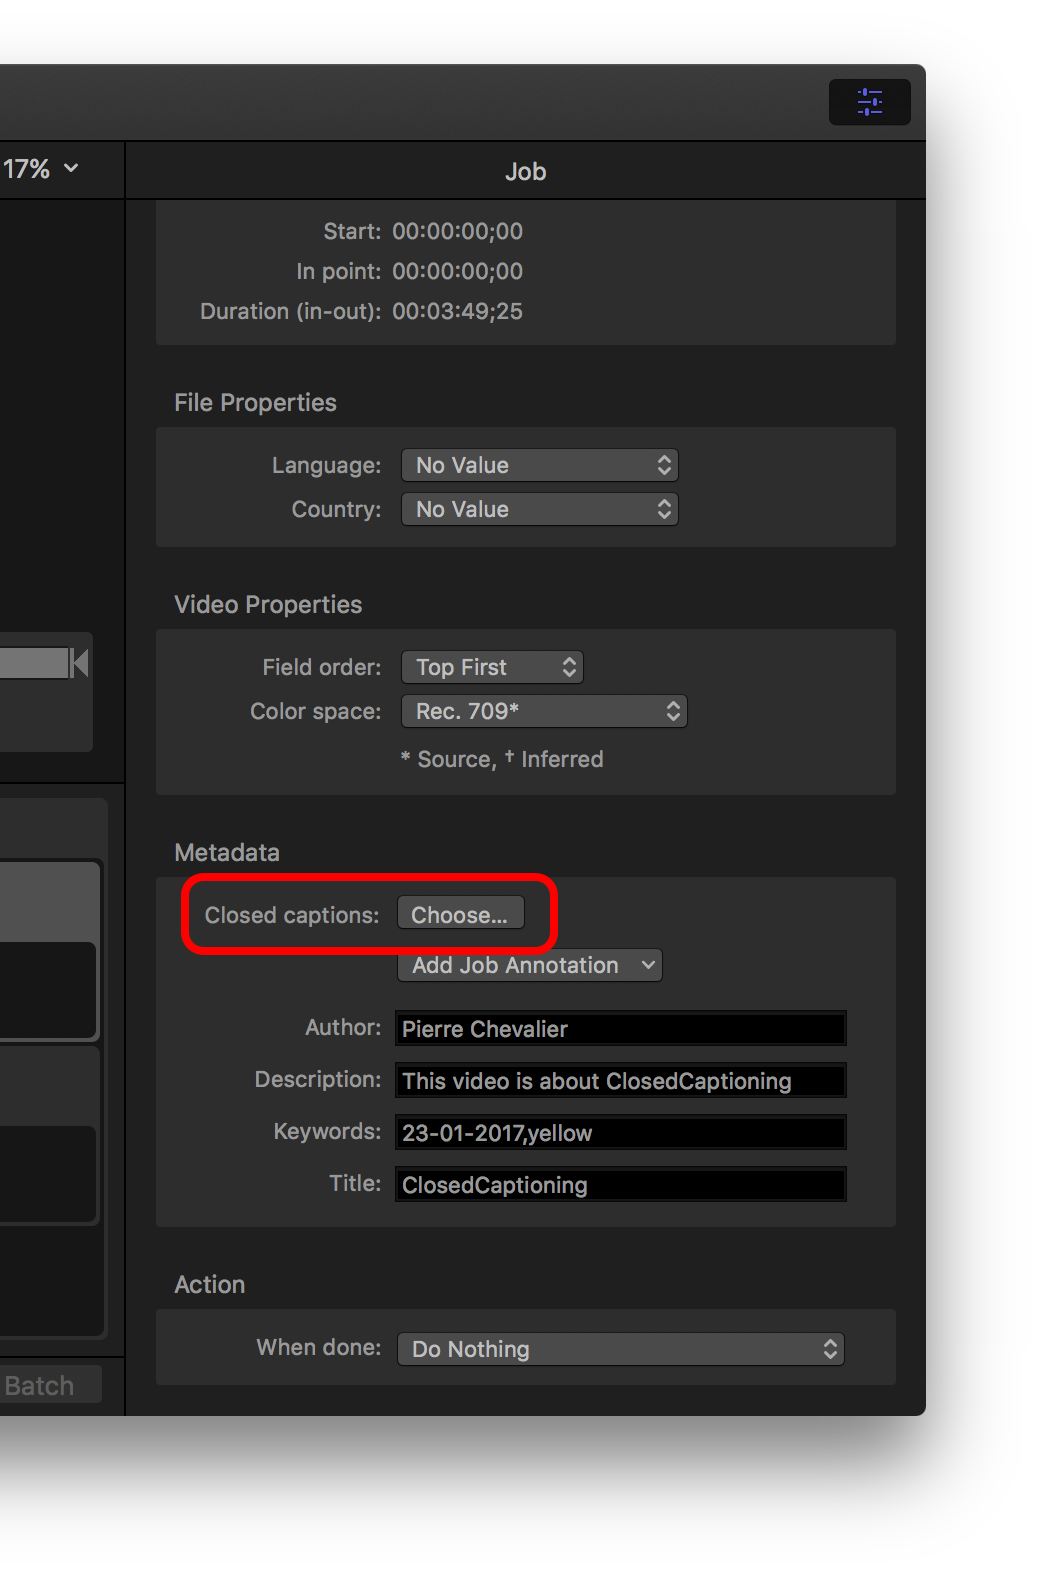
Then when you process the job, depending on the format chosen, it will create different type of files (source Apple help center):
-
QuickTime files: (this is the one you ahem to select for compatibility with Softron playout applications) Compressor adds the closed-caption file as a closed-caption track to the QuickTime output file. You can view the closed captions using QuickTime Player (version 7.2 or later).
-
MPEG-2 elementary stream files: Compressor embeds the closed-caption data in an elementary MPEG-2 video stream so that it can be used for DVD authoring.
-
MPEG-2 program and transport stream files: Compressor embeds the closed-caption data in program and transport MPEG-2 streams using the EIA-608 ATSC protocol.
-
MPEG-4 (MP4) and H.264 for Apple Device (M4V) files: Compressor embeds the closed-caption data into MP4 and M4V files using the EIA-608 ATSC protocol. You can view the closed captions using QuickTime X.
For OnTheAir Video or OnTheAir Node, you will have to choose a QuickTime file, so a closed captioning track is created. Our playout solutions do not support the other types.
4.2.3. Using MacCaption
One of the most known solution (they've been around for a while) is to use MacCaption from Telestream. It is a complete product, with a lot of different uses possible. You can create .scc files there, but you can also create a video file with a Closed Captioning track. Below are a few hints, but we won't go into too much details, as the product is very complete. Check the knowledge base on the Telestream website for more info on this.
- Once you have finished your editing in your favorite editing application, export it.
- Open the file you exported in MacCaption by going to the menu "File > Open Movie..."
- You can then play the file, and either
- do the transcription directly in the MacCaption application
- import a file with the transcript already done (if you used a transcription service). Select the menu "File > Import > ..." and select the type of file that you want to import
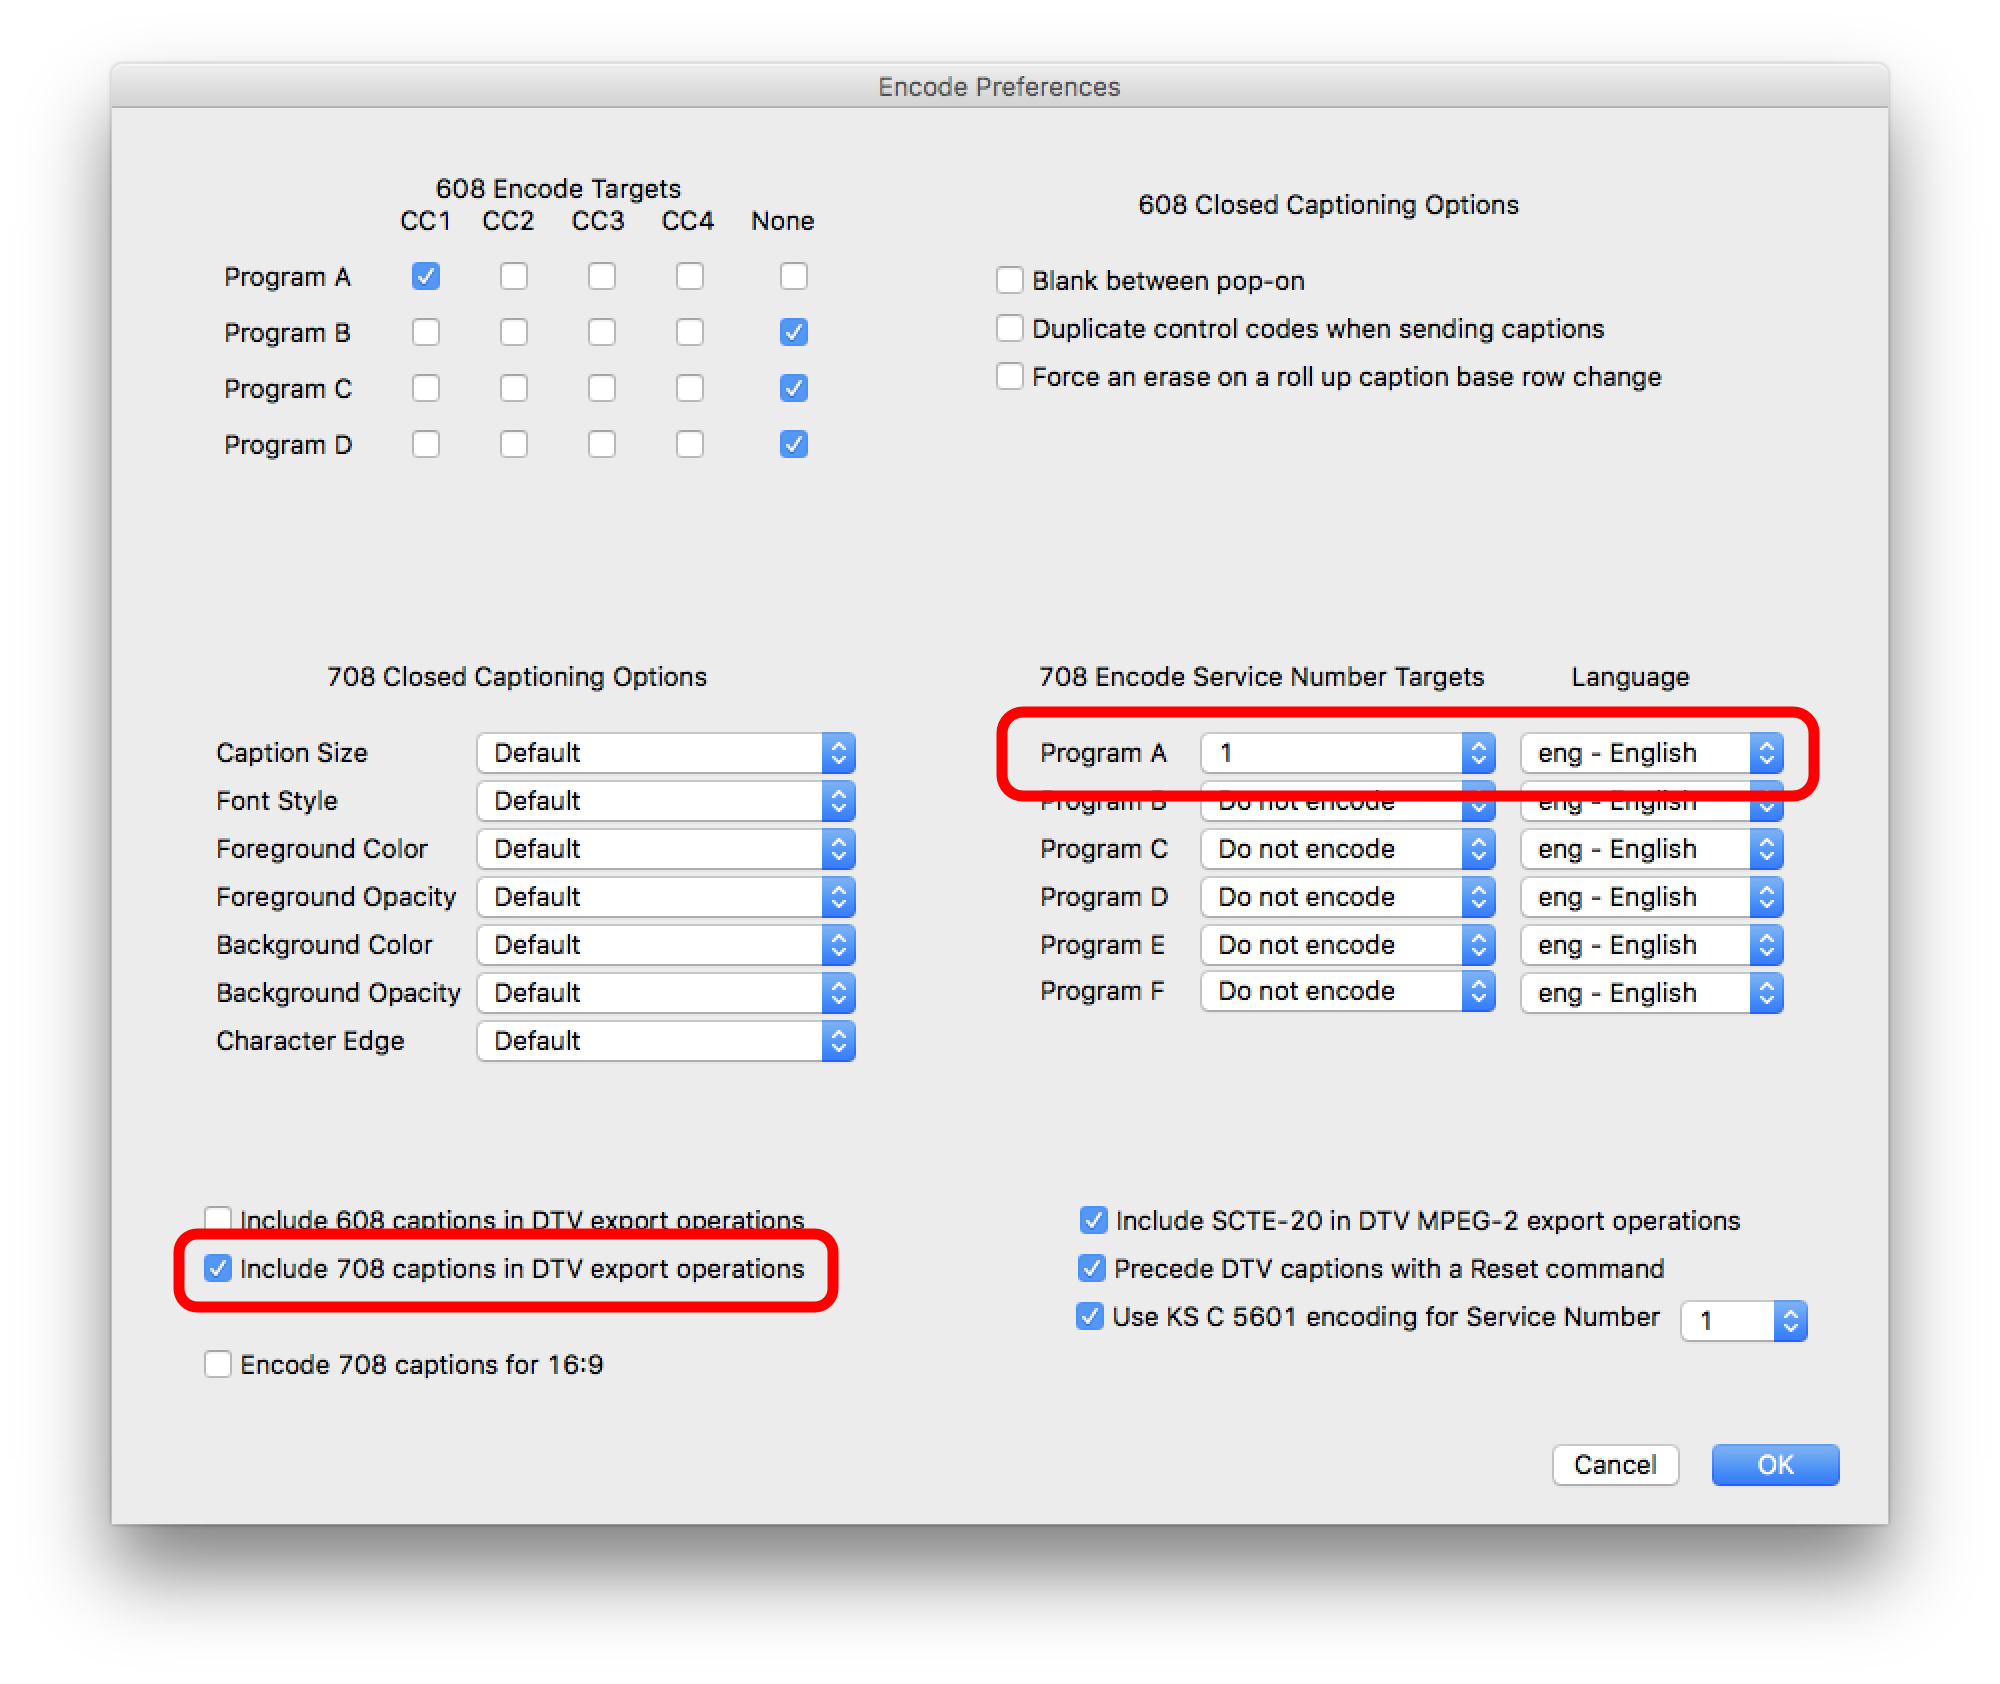
- Once the captions are done, verify the "Caption" settings in the menu "Caption > Encode Preferences...". These settings depend on your use (and it should be done once), but basically make sure that the 708 captions option is checked and that the Program/Service is correctly set for you.
- Then select the menu "File > Export > Embed CC into Media > QuickTime DTV 608/708 Closed Captions Track..."
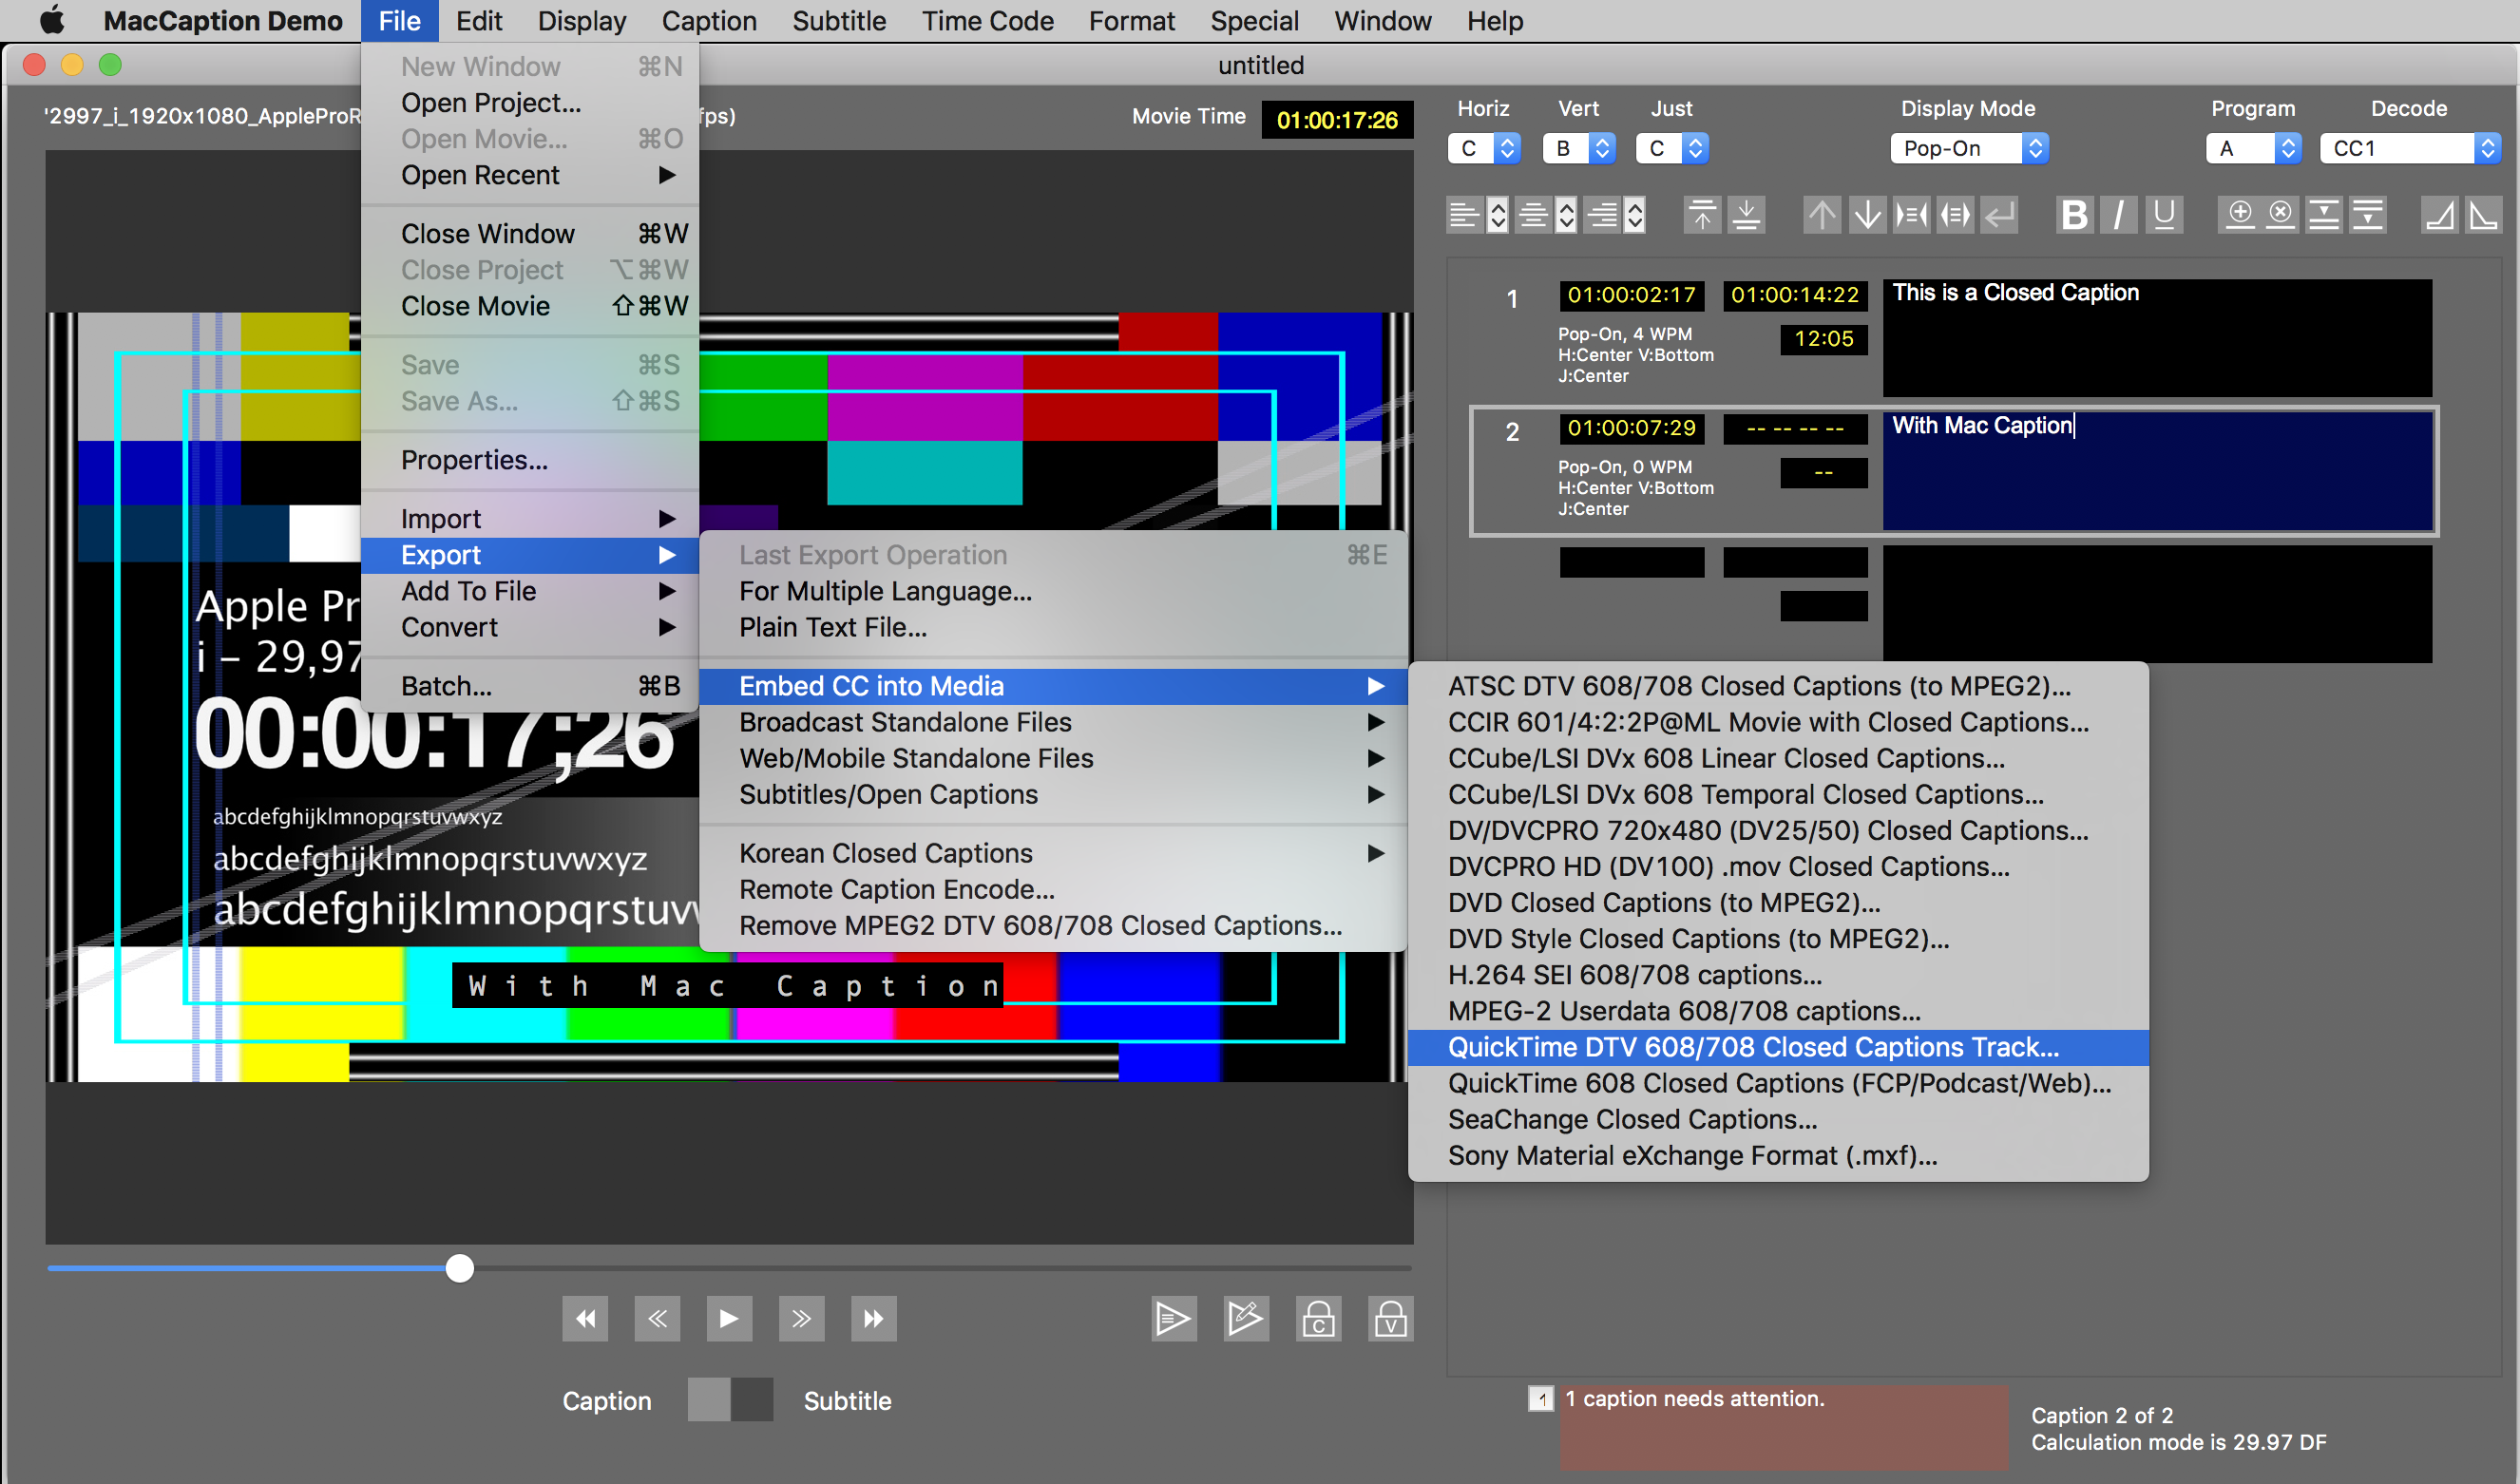
- Then select where you want MacCaption to export your video to.
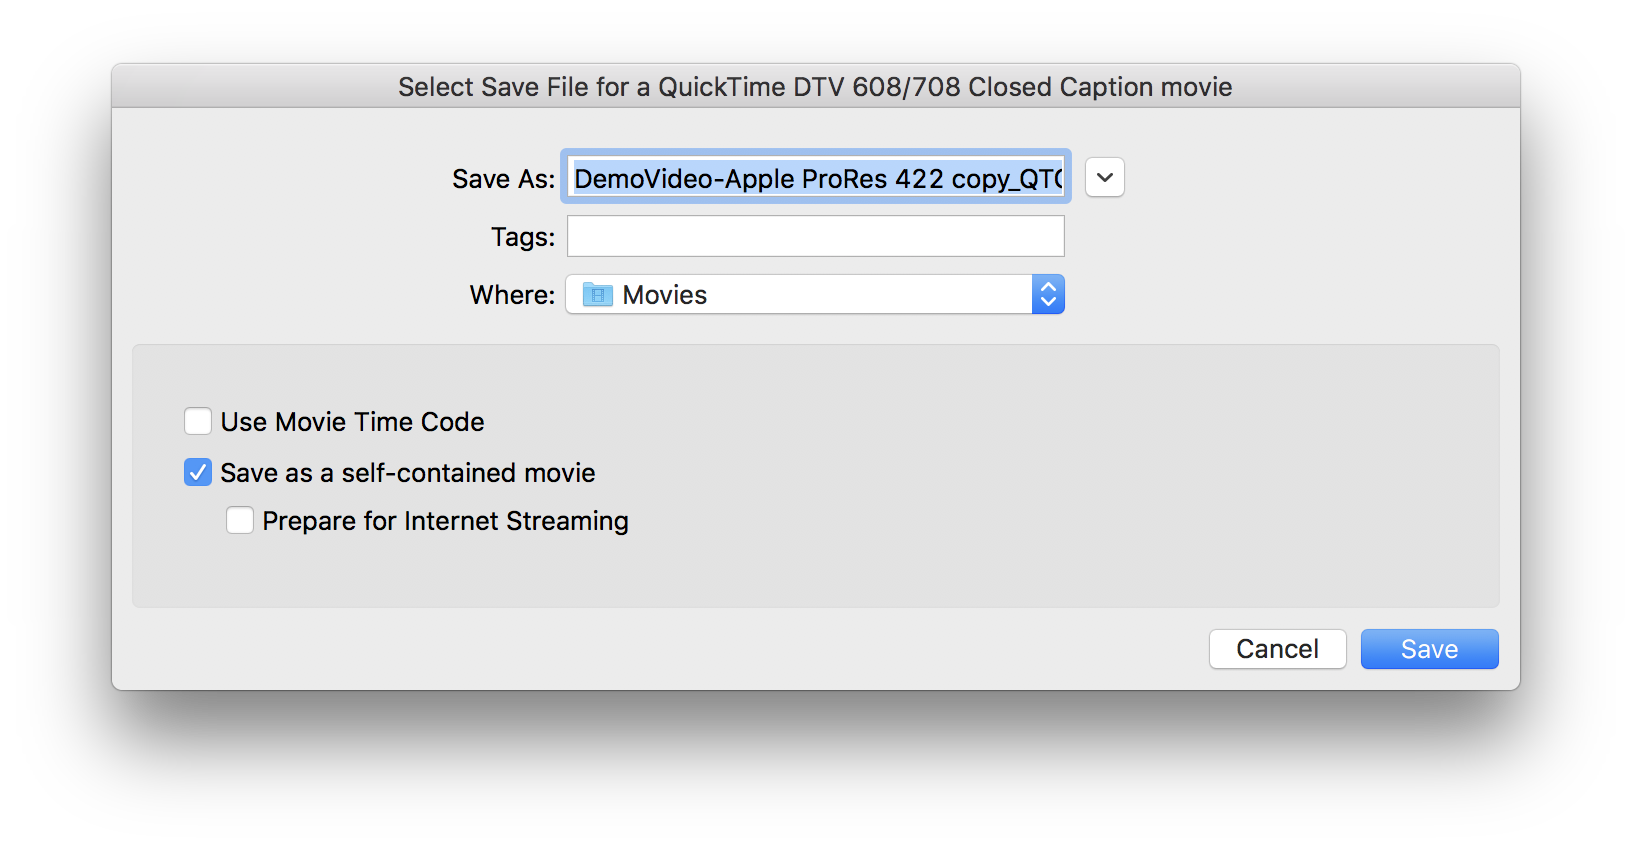
This will export a QuickTime movie with a Closed Caption track.
5. HOW TO: Create compatible files for SD
To create files with CEA-608 VBI (Line 21), the best is to use MacCaption. Again, here you will not need to create a QuickTime closed caption track, but use line 21 of the VBI to embed it. See this (source: MacCaption user manual):
-
Line 21 VBI. This is used for standard definition video only. The VBI line 21 "Morse Code" dots-and-dashes are embedded into the top line of the video. The video resolution must be 720x486 for most QuickTime and AVI formats (rather than 720x480, which excludes the extra 6 lines of VBI where the captions go), or sometimes 720x512 for certain MPEG-2 formats.
To create a file with CEA-608 VBI (Line 21) in MacCaption:
- Once you have finished your editing in your favorite editing application, export it. Make sure that your file is a CCIR 601 file. You can export it to ProRes and make sure to select 720x486 for the resolution. Indeed, the 720x480 don't have those 6 VBI lines where the captions go. Attached to this article is a "Compressor Droplet" that will convert your movies to the appropriate resolution with 16:9 aspect ratio. (Compressor Application required)
- Open the CCIR 601 NTSC file in MacCaption by going to the menu "File > Open Movie..."
- You can then play the file, and either
- do the transcription directly in the MacCaption application
- import a file with the transcript already done (if you used a transcription service). Select the menu "File > Import > ..." and select the type of file that you want to import
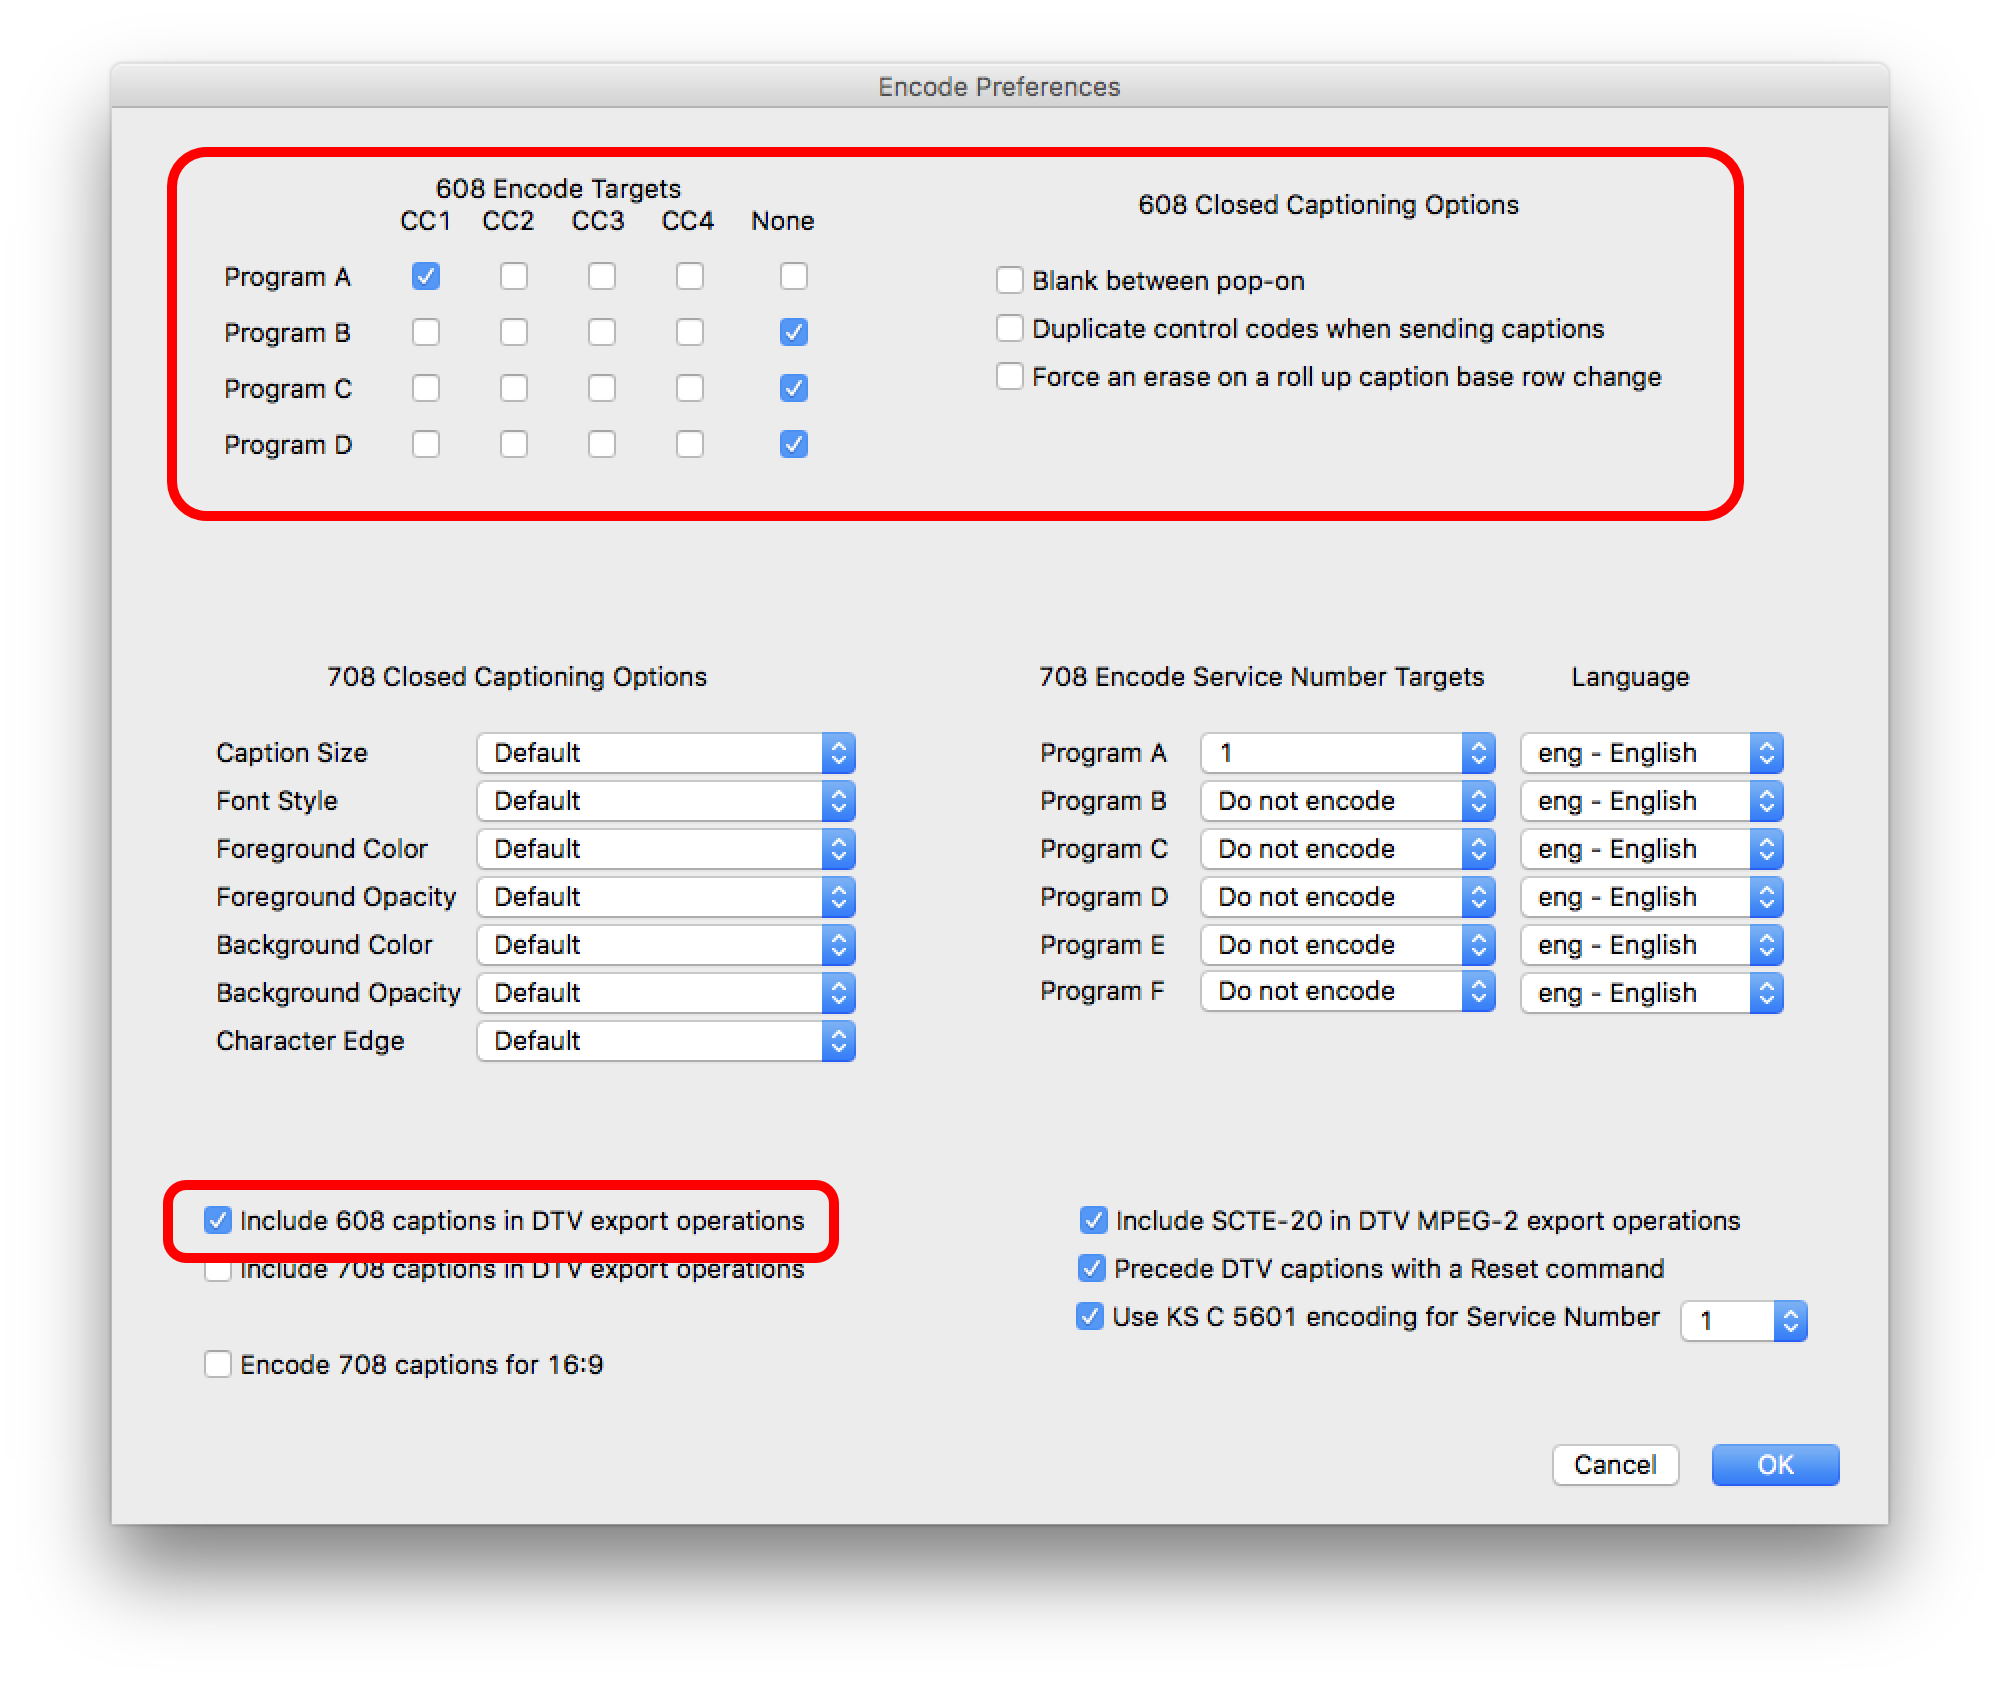
- Once the captions are done, verify the "Caption" settings in the menu "Caption > Encode Preferences...". These settings depend on your use (and it should be done once), but basically make sure that the 608 captions option is checked and that the Encode Targets is correctly set for you.
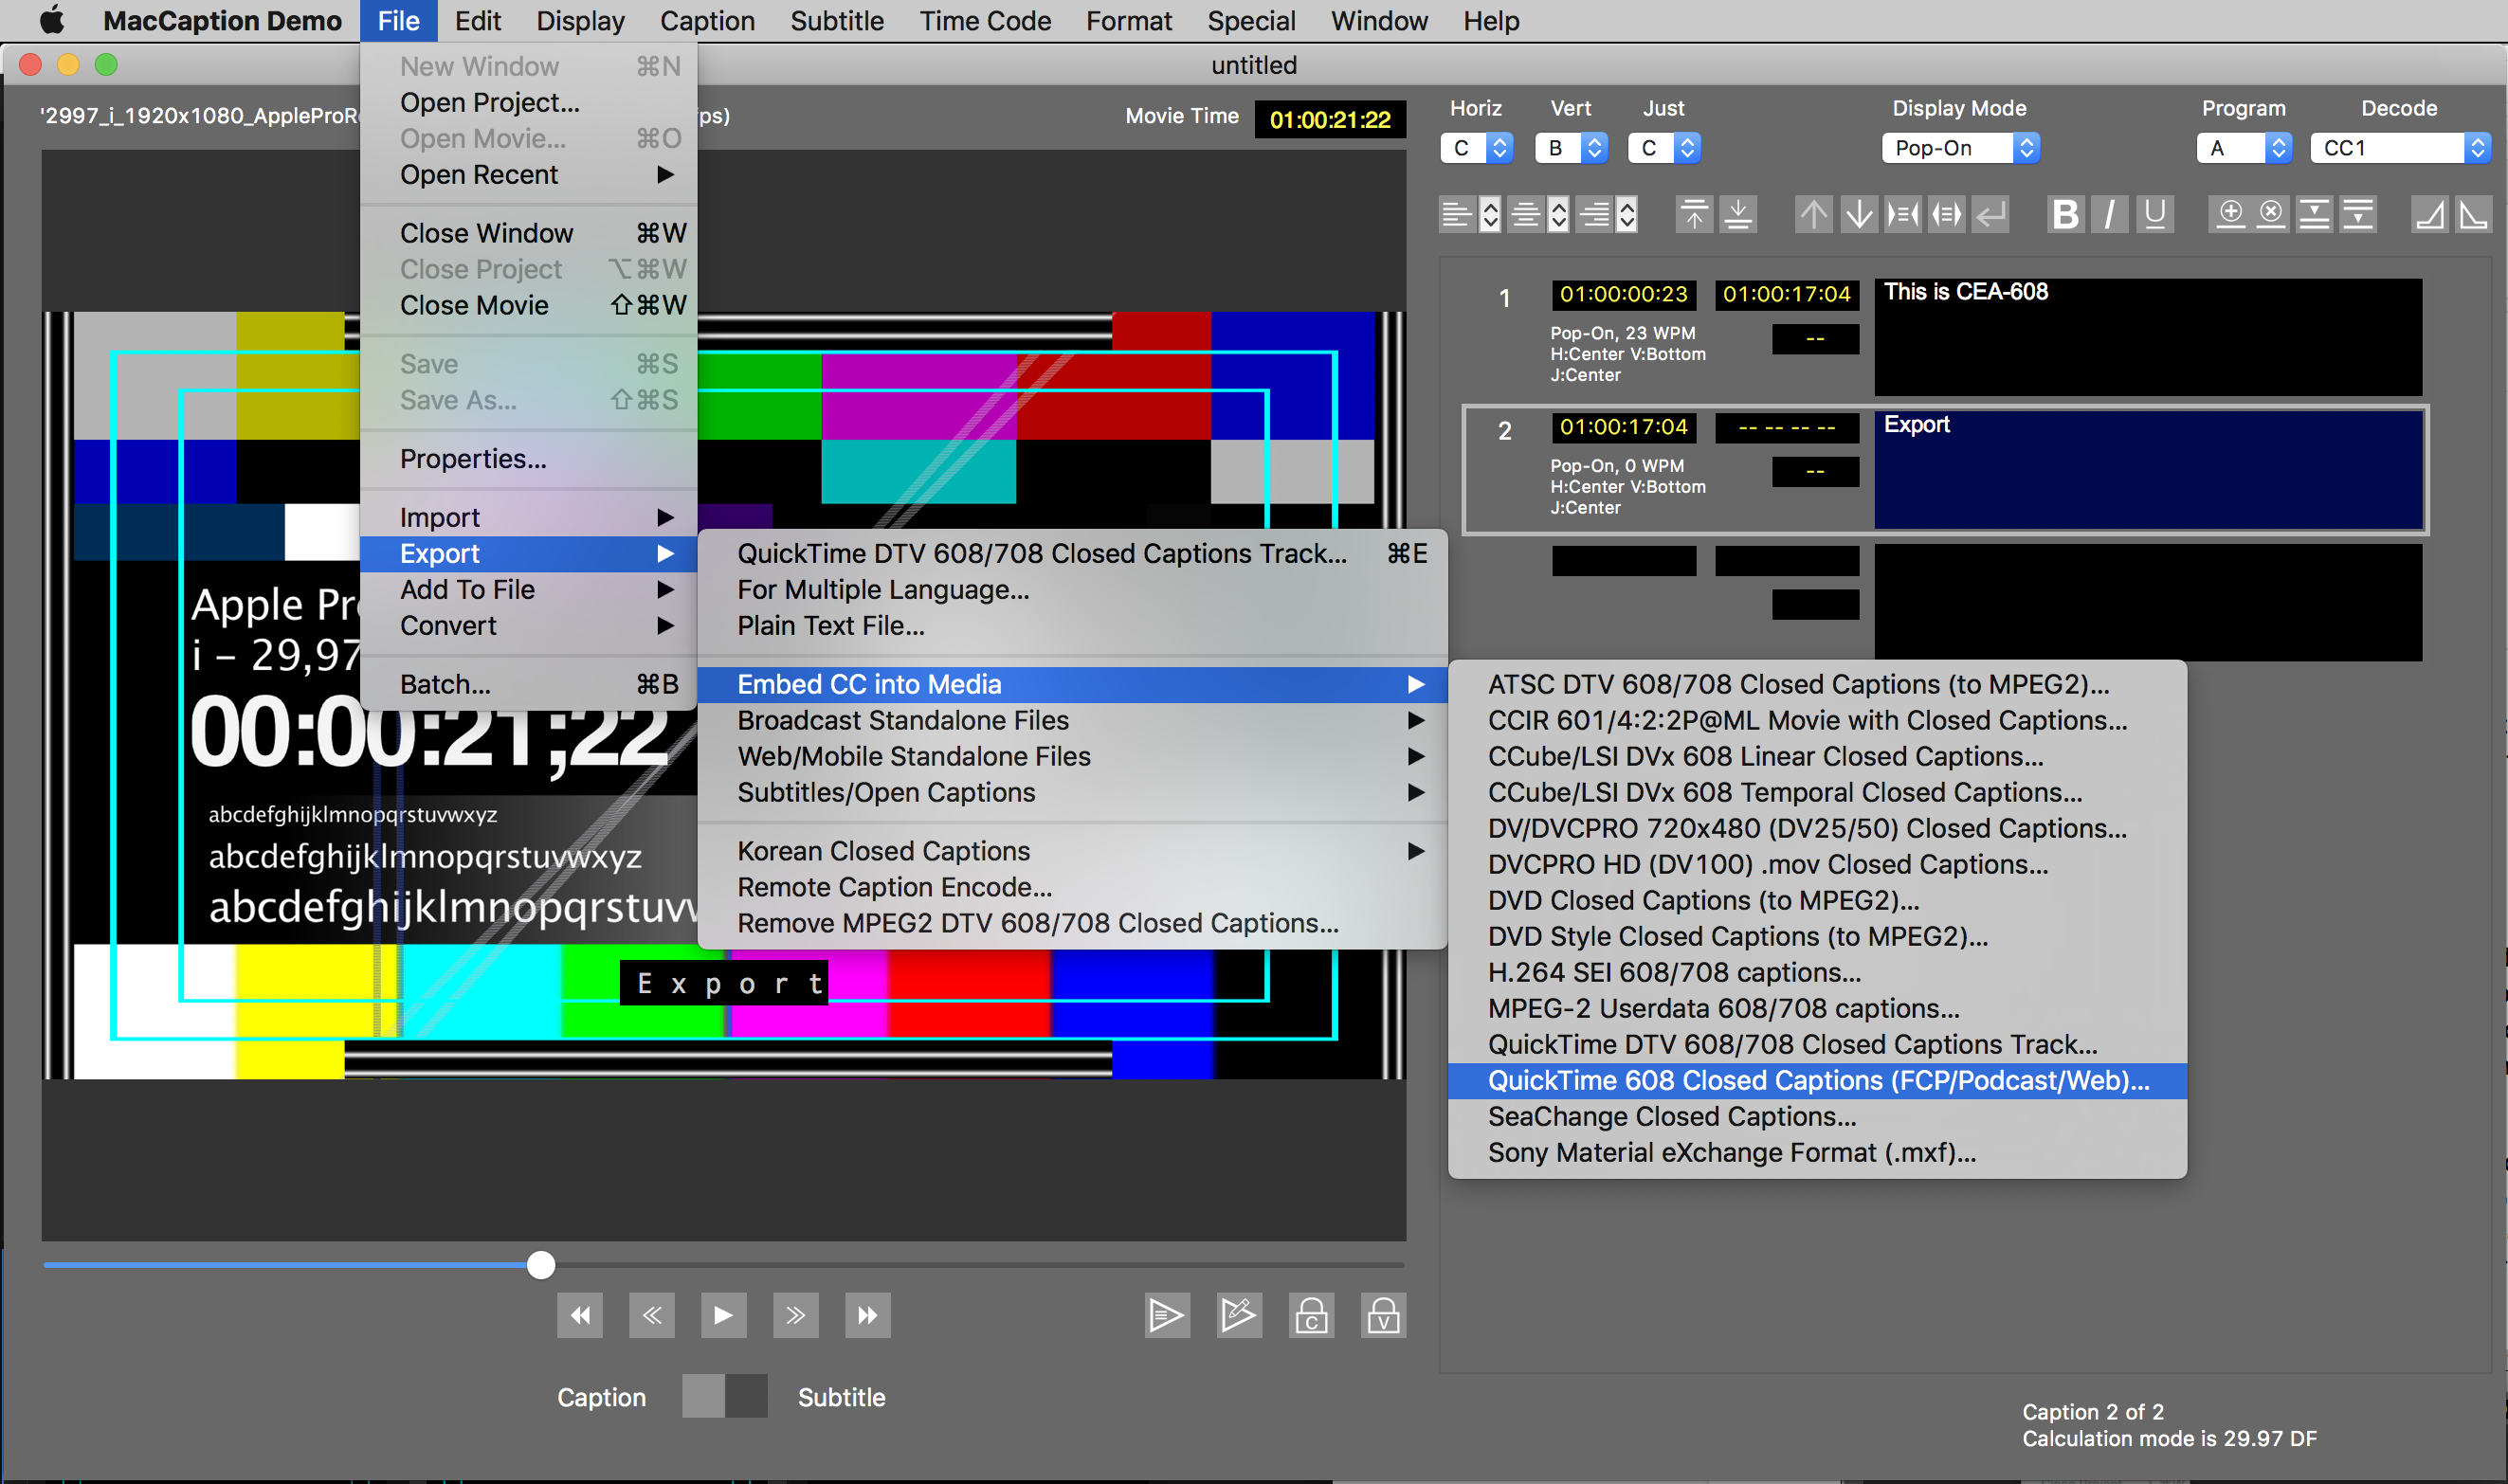
- Then select the menu ""File > Export > Embed CC into Media > CCIR 601/4:2:2 Movie with Closed Captions..."
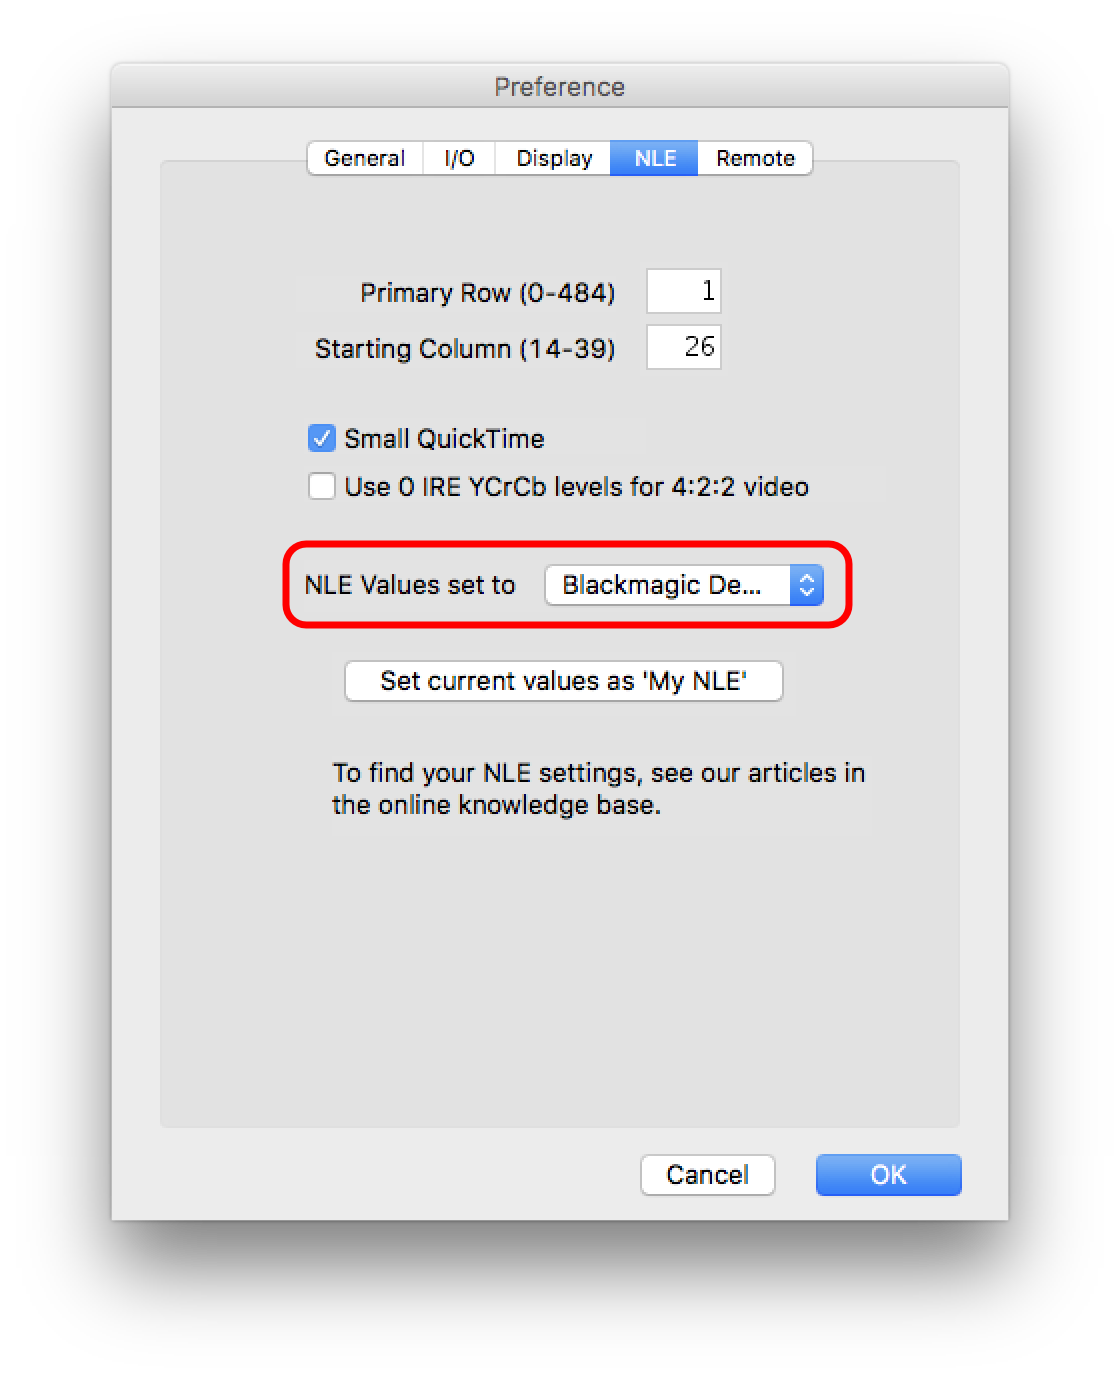
- The next window allows you to select where you want MacCaption to export your video to, as well as other settings. By default, the CC track is encoded for Blacmagic Decklink.
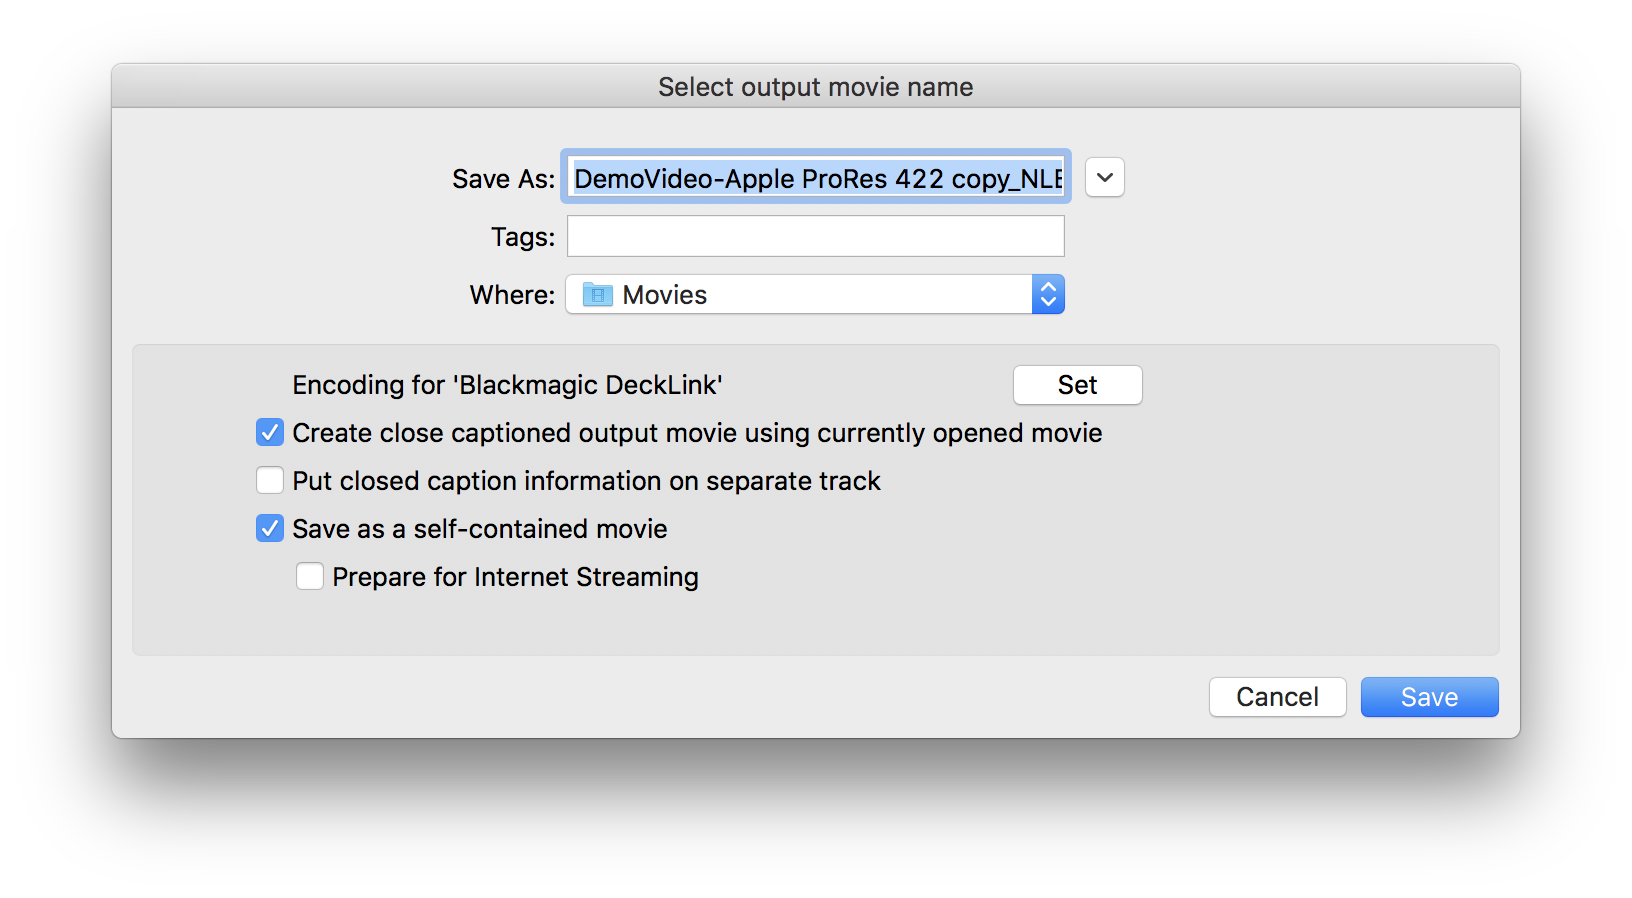
- If you use a different video device, click on the button "Set" and choose the appropriate "NLE Value". In the tests that we have done, it seemed the default "Blackmagic Device" worked fine if you are playing out with an AJA or Blackmagic-Design device in OnTheAir Video or OnTheAir Node, so it used these settings:
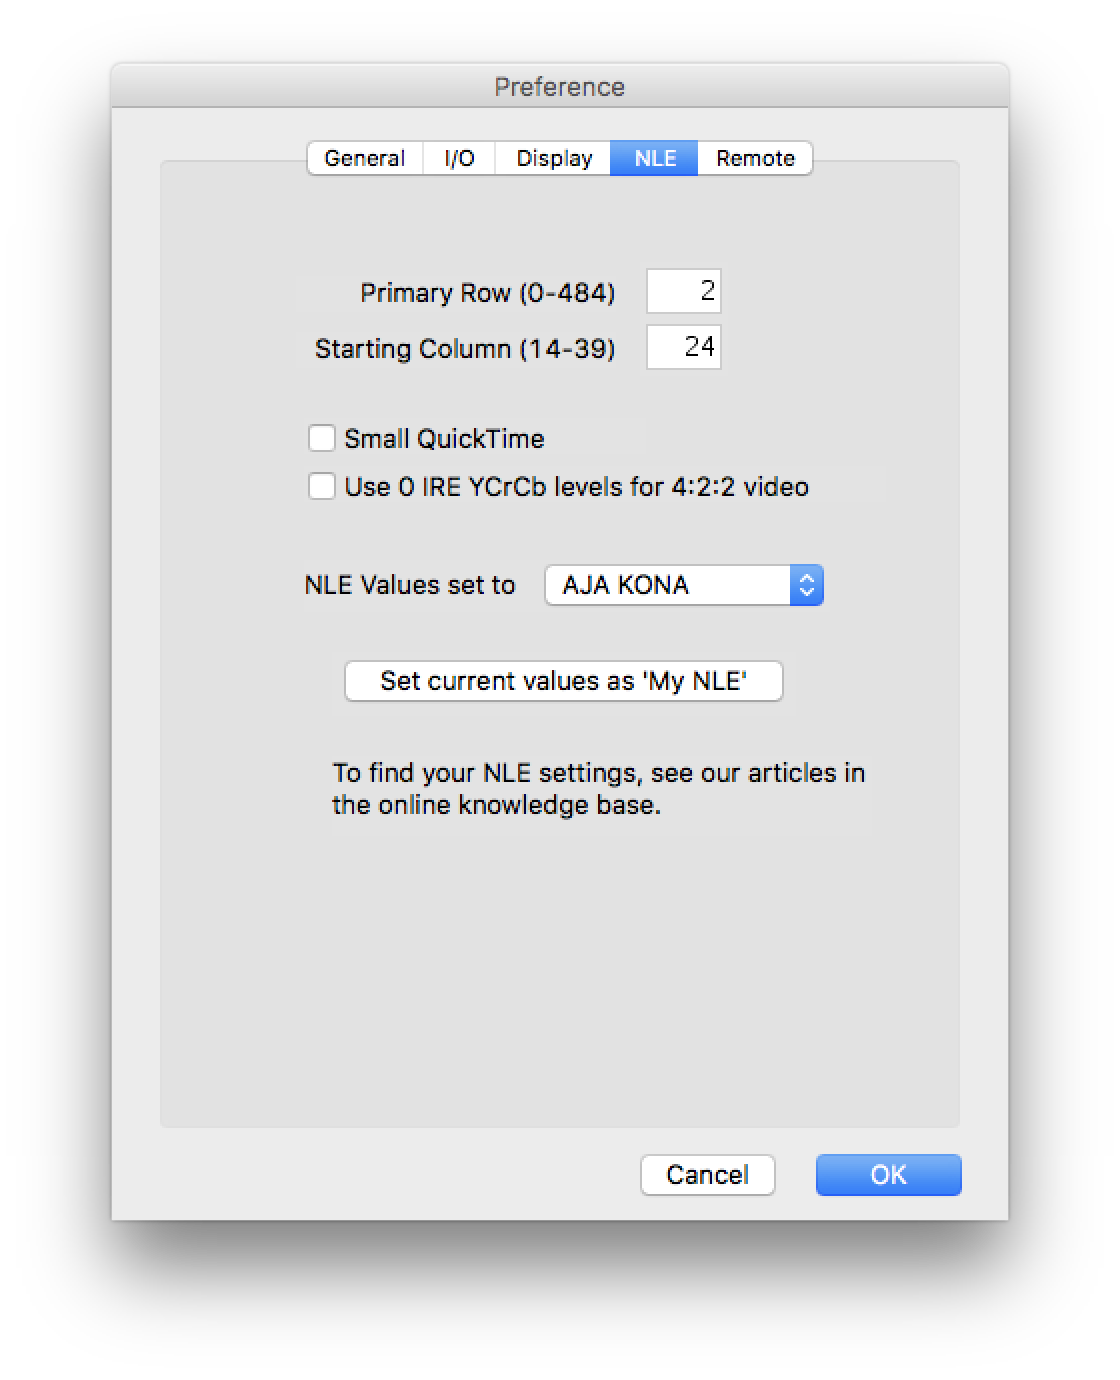
- But if you use Deltacast cards, you will probably have to use these settings:
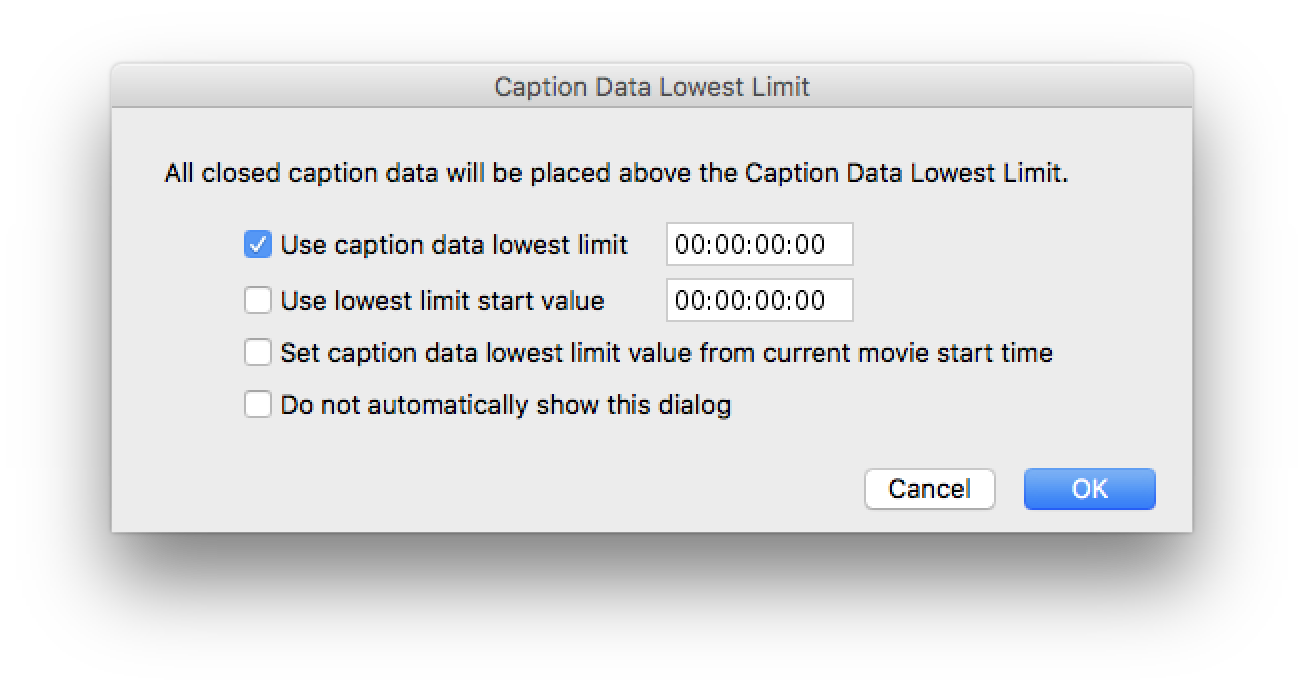
- Then select how you want to set the Caption Data Lowest Limit. Check the MacCaption user manual for that, but here is what they say in their manual: "The Caption Data Lowest Limit should be set to start when the actual video content starts. For example, If you are using pop-on captions and the movie time code starts at 0:58:00:00, the actual video content starts at 1:00:00:00 and the first closed caption appears at 1:00:01:00, which is one second into the video content, the actual closed caption data is placed into the movie before the caption is scheduled to pop on at 1:00:01:00. In this case you would set the Caption Data Lowest Limit to 1:00:00:00 to force MacCaption to begin putting the closed caption data into the movie no earlier than time code 1:00:00:00."
- In the next window, choose the "Compression Setting"
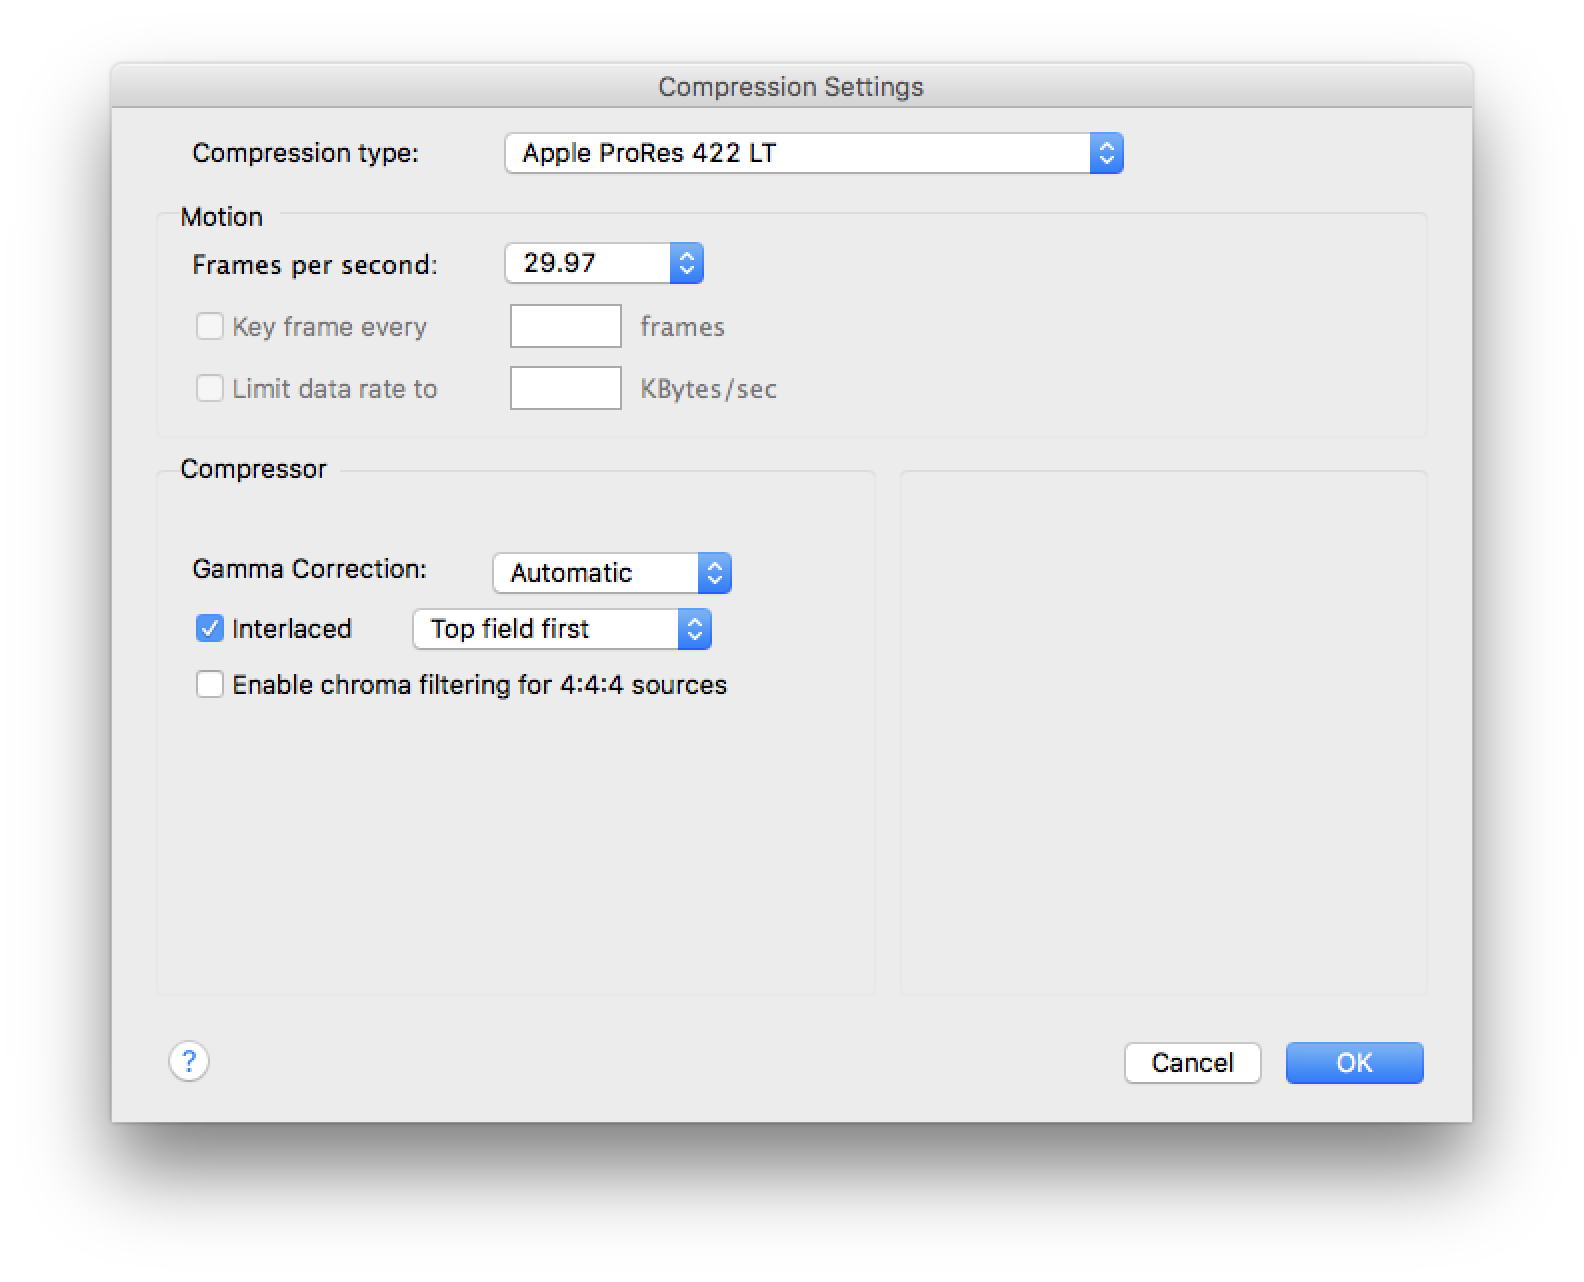
- Then click on "OK". This will encode the video again, so it will take more time than with CEA-708 track where it basically just adds a track to the QuickTime file.
We also recommend you to look at the MacCaption user manual and/or contact their support if you have more detailed questions about this application, we won't be able to provide support for it.
6. Validating the files for CEA-708 CC (HD)
Again here there are also multiple ways to check the presence of CC in a file. It will also depend on the type of CC (CEA-608 or CEA-708), let's list a few.
Also, we highly recommend to test that the files are working fine in your specific workflow. Test in real life, output with the device that you will be using, in the same format and using the same hardware. There are many things implied here, and many different requirements.
6.1. With a TV monitor
The best way to check (as it is the most accurate), is to playout the file in OnTheAir Video or OnTheAir Node, output it to SDI (HDMI does not transmit the CC info), and use a device that can extract the CC data and overlay it on top of video before outputting it to a HDMI TV monitor. There are multiple products that can do this, here are 2:
- the Grass Valley Kaleido Solo: https://www.grassvalley.com/products/kaleido-solo
- the Ensemble Designs Bright Eye 723: https://www.ensembledesigns.com/products/brighteye/be72
6.2. With OnTheAir Video
When you import a file with a valid CC CEA-708 track, you should see the following icon on the item in the playlist (If the track is instead a CEA-608, the icon should be red and striked through to show that it is not valid):
![]()
In the inspector, you should be able to view the type of CC track:
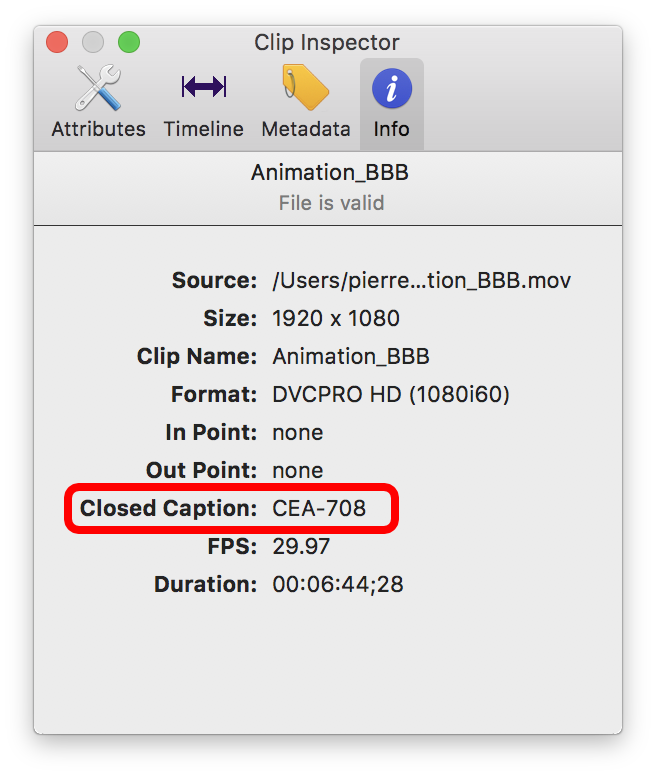
With QuickTime
When you open the file with QuickTime X, you can select to overlay the Closed Captioning. For that, go to the menu "View > Subtitles > Auto"
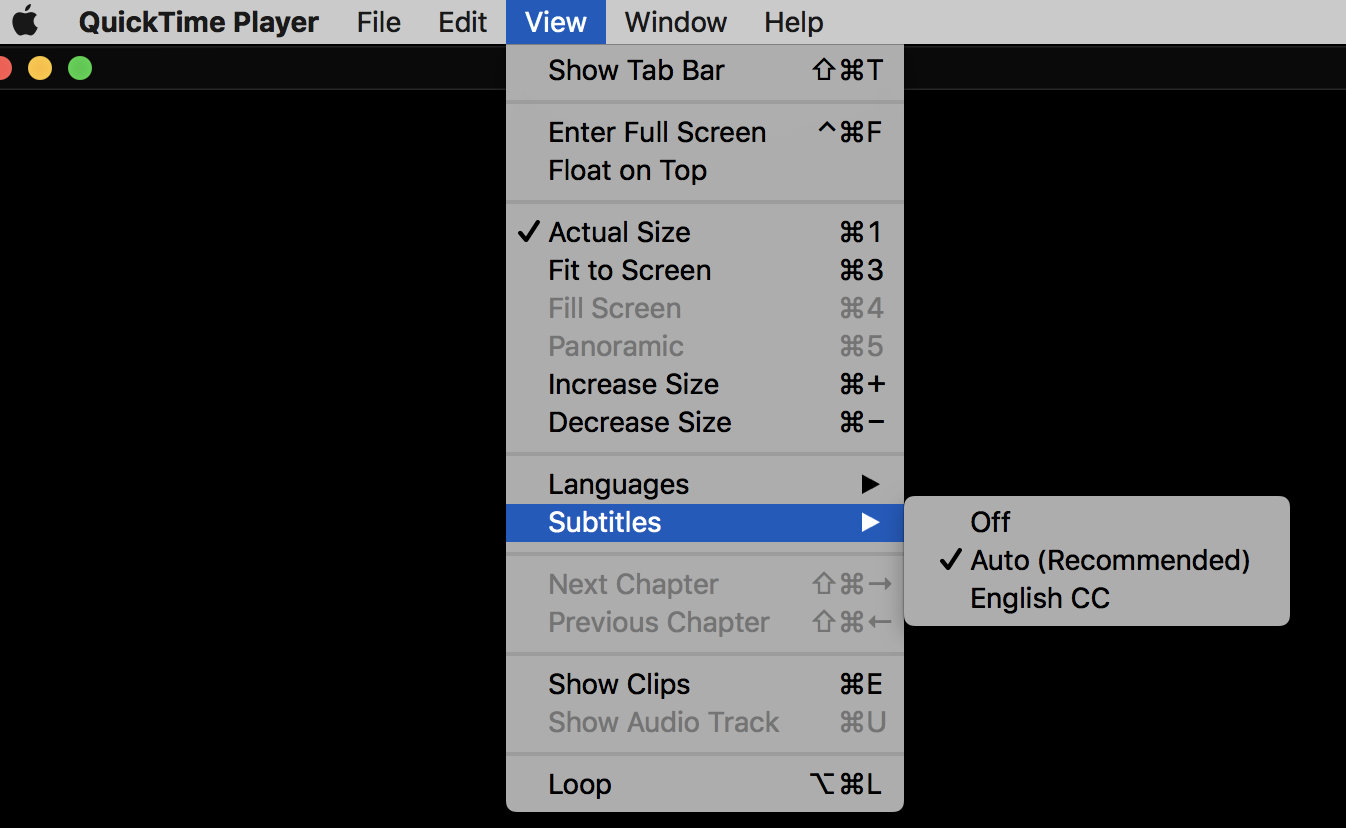
Now if you play the video, it should overlay the Closed Captioning track.
Additionally, with the "good old" QuickTime 7 Pro, you can verify that the Closed Captioning track is present in the menu "Window > Show Movie Properties", and check that the CC track is there:
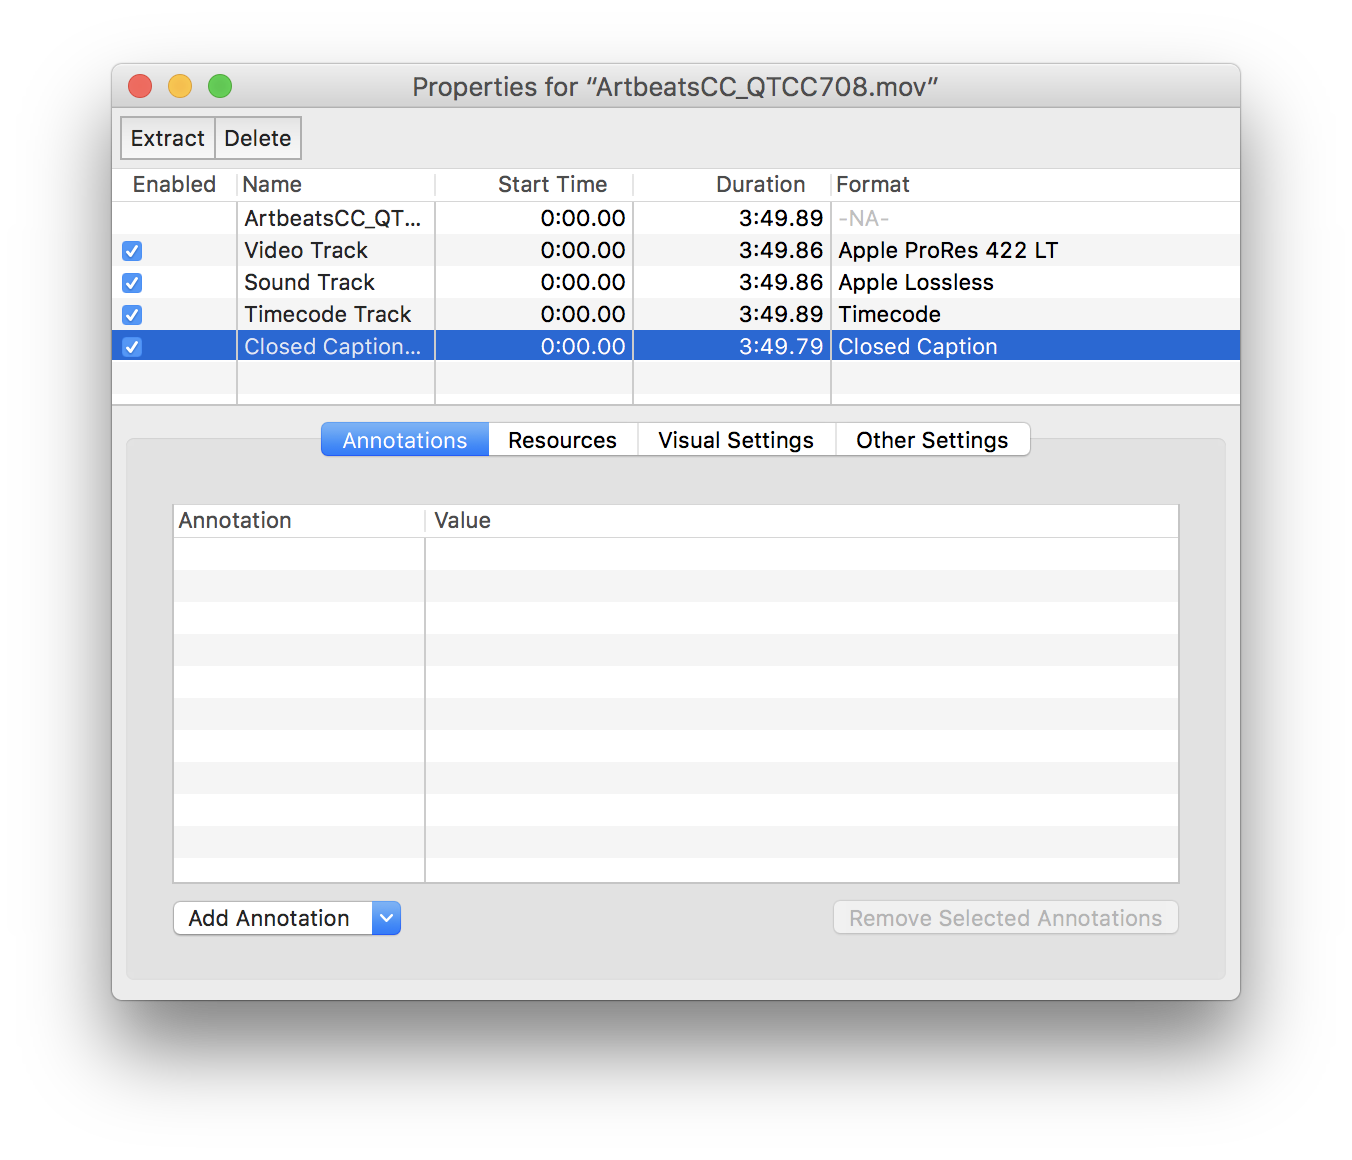
Note that this will only tell you that there is a CC track, but not that the data inside is accurate, it could very well be an empty CC track...
In Adobe Premiere Pro
If you import the file in Adobe Premiere Pro, and you double-click on it in the project browser, and if there are CC, it should open the Captions pane automatically and show you the list of CC. At the top of the window, you can also select the Caption Stream if the file has multiple CC information:
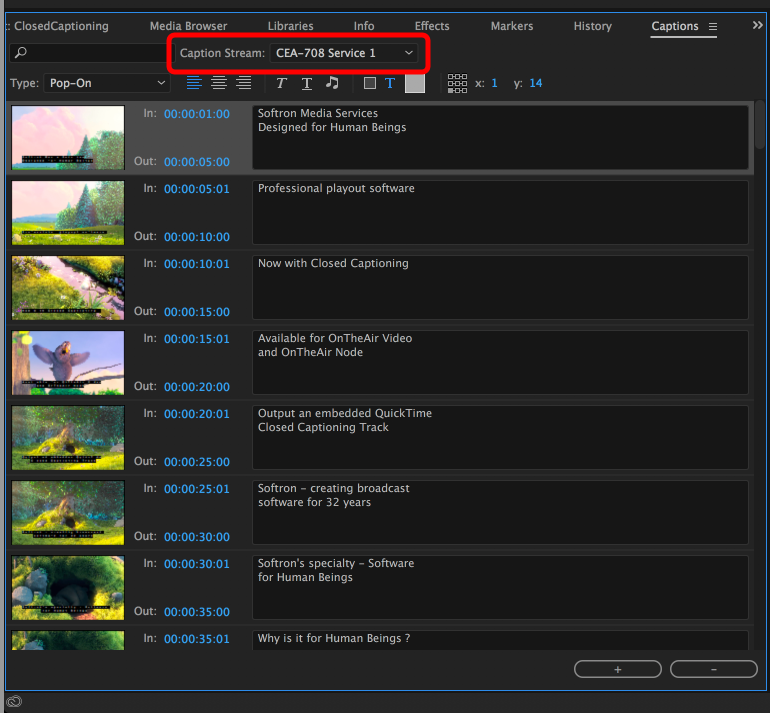
Note that when you import files with CC it may take a little while for Premiere to interpret all these Captions, during that moment, you will see a warning telling that there is a process taking place.
With MacCaption
MacCaption also interprets the file it opens to read the CC track. But it's a 2 step process. First select "Open Movie..." to open the movie, then select the menu "File > Import > Extract CC from Media > QCC Multi-Format Import..."
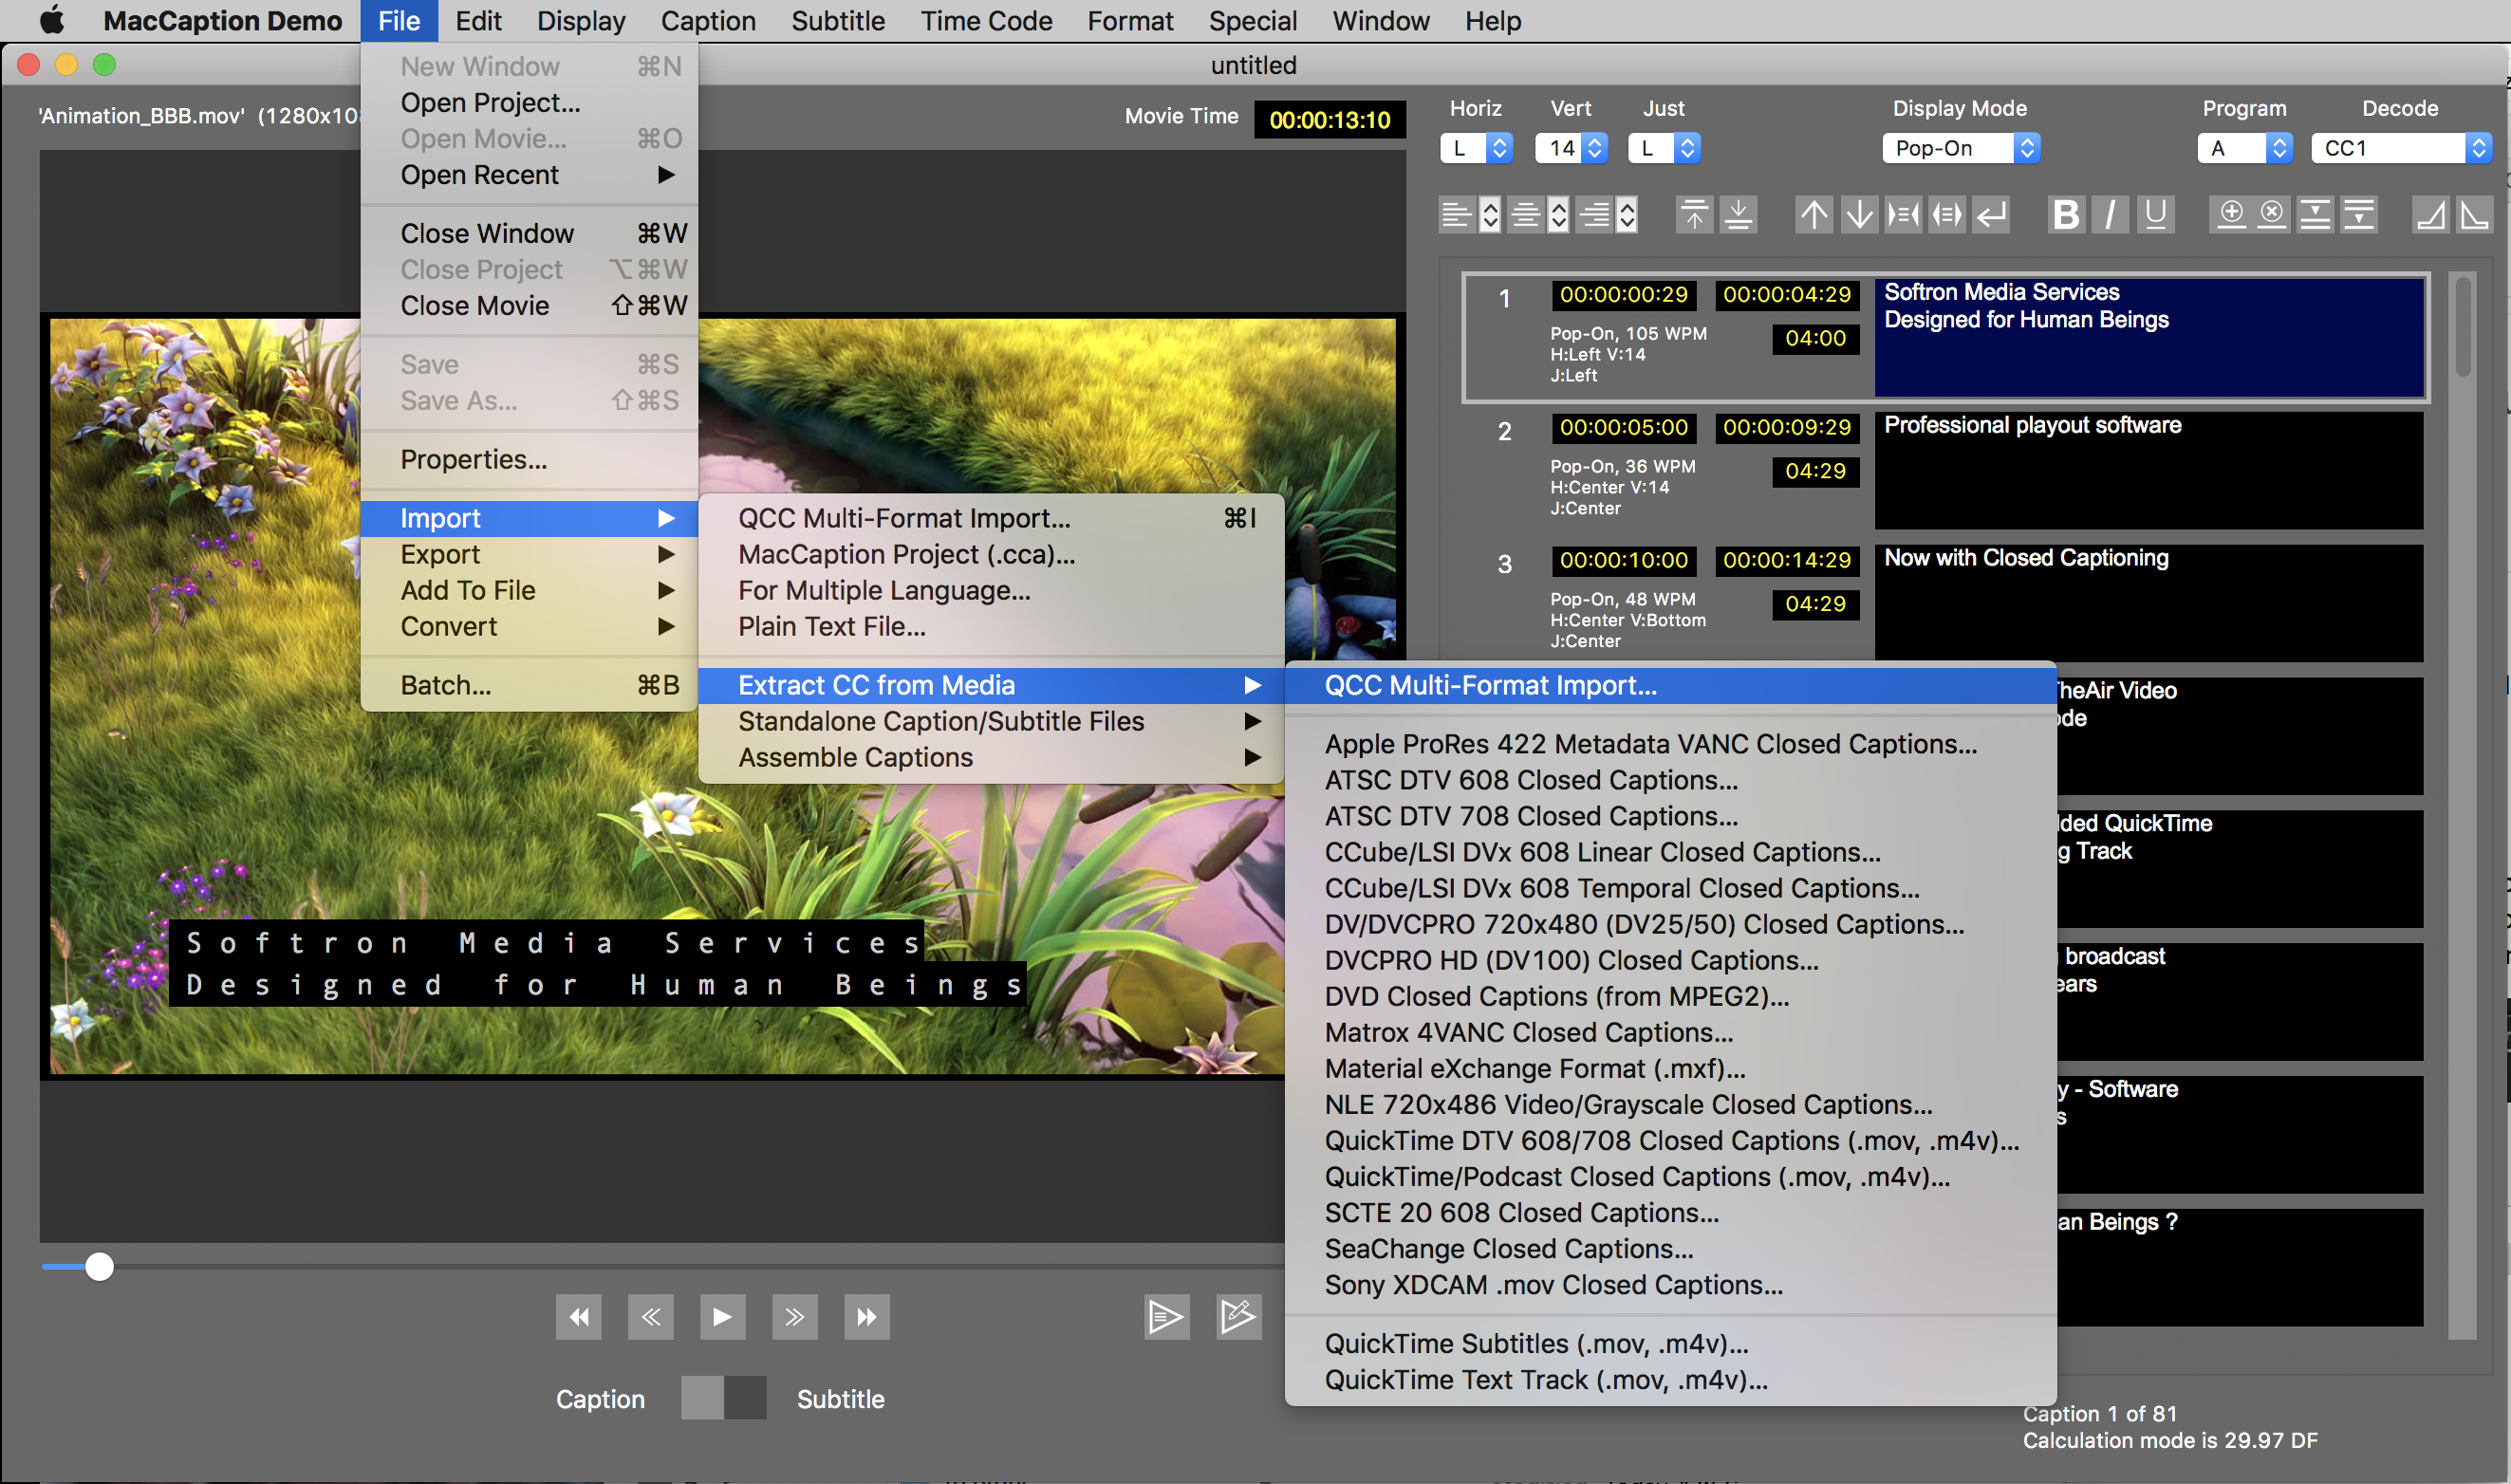
MacCaption will then analyse the movie and extract all the CC info.
With MediaInfo
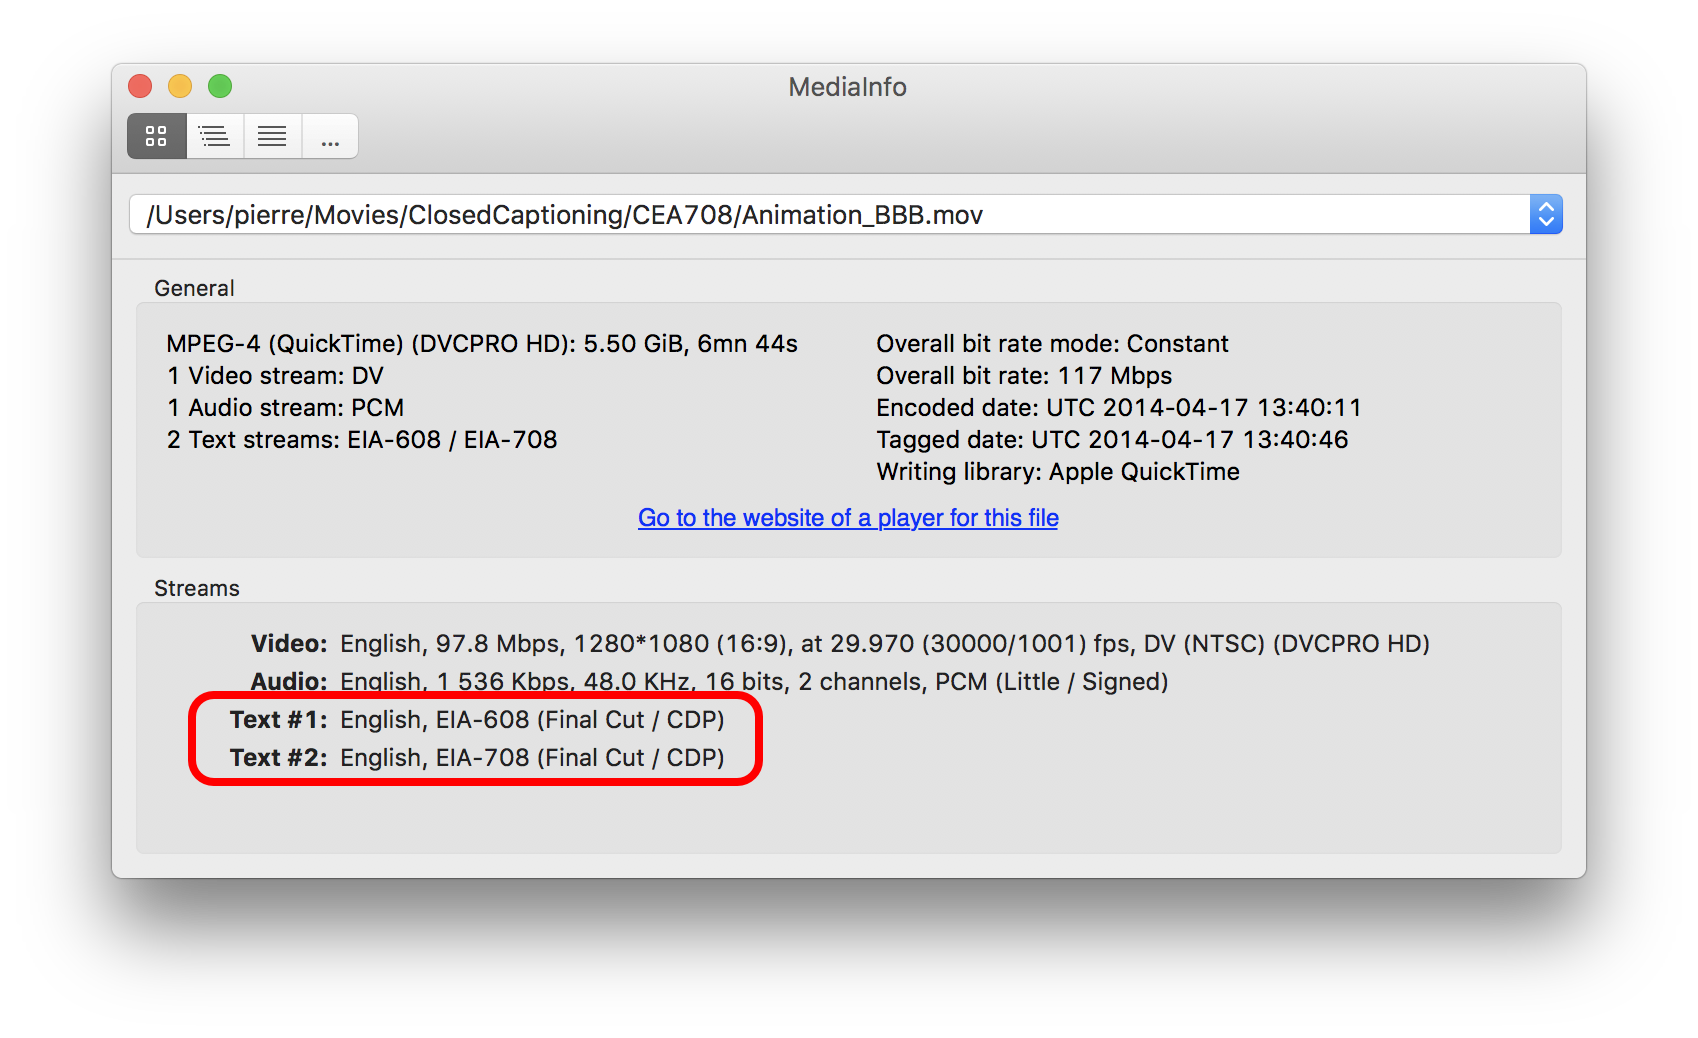
The application MediaInfo can be very useful to analyse a video file, check its format, etc... If you open the file that you have created, you can check that there is a Closed Captioning track. But again here, as with QT7, it only tells you that there is a track, not that the data inside the track is accurate...
Validating the files for CEA-608 (SD - Line 21)
With CEA-608 as supported by OnTheAir Video and OnTheAir Node, it is not possible to check the presence of the track. Indeed the CC data is in the invisible lines of the video frame itself.
With a TV monitor
The best way to check (as it is the most accurate), is to playout the file in OnTheAir Video or OnTheAir Node, output it to SDI (HDMI does not transmit the CC info), and use a device that can extract the CC data and overlay it on top of video before outputting it to a HDMI TV monitor. There are multiple products that can do this, make sure that they support CEA-608 in Line 21. Here are 2:
- the Grass Valley Kaleido Solo: https://www.grassvalley.com/products/kaleido-solo
- the Ensemble Designs Bright Eye 723: https://www.ensembledesigns.com/products/brighteye/be72
With QuickTime
Again the CEA-608 information is kind of a morse code, small black and white dots that are generated at the top of the frame on line 21. Some video players will display those lines. So the idea here is to open the file with QuickTime for example, play the file, and try to see those moving dots. In the screenshot below, you can see some small white dots at the top of the image:

Of course you won't be able to see if the data is accurate here, just that there is something present...
Comments
0 comments
Please sign in to leave a comment.